Build Polished Websites Faster with Google Stitch 2.0 and Claude Code
Google Stitch 2.0 solves one of Claude Code’s genuine weaknesses: front-end design. By using Stitch to generate a design-system-backed mockup first, then handing the exported code to Claude Code, you can compress days of iteration into a single browser session. After working through this workflow, you’ll be able to produce production-ready landing page designs, export them as clean front-end code, and drop that code directly into Claude Code for a polished final build.
- Go to stitch.withgoogle.com and switch the mode selector from App to Web. Web mode unlocks the Gemini Pro model tier and surfaces web-specific generation prompts in the interface.

2. In the model selector, choose Gemini Pro over Flash. The Pro model is slower but produces noticeably higher-quality output — the trade-off is worth it for anything client-facing.
Warning: this step may differ from current official documentation — see the verified version below.
3. Before writing a prompt, open Pinterest, Dribbble, or godly.website and screenshot a layout that matches your target aesthetic. A concrete visual reference does more work than any amount of descriptive language in a prompt.
4. Back in Stitch, attach your screenshot via the upload icon in the chat bar — or paste a live website URL. Either input anchors the model to a real visual direction rather than its defaults.

5. Write a tight brief: agency name, purpose, and a pointer to the attached screenshot. Something like “Create a landing page for my AI agency, Chase AI, in the style of the screenshot. I want the exact same hero page setup as seen in the screenshot.” Stitch extrapolates everything else.
6. When generation completes, open the Design System panel on the right. Stitch auto-generates a named system — “Obsidian Ember” in the video — with a seed color, full palette, typography scale, corner radius, and component rules. Click the theme name to adjust any value without touching CSS.
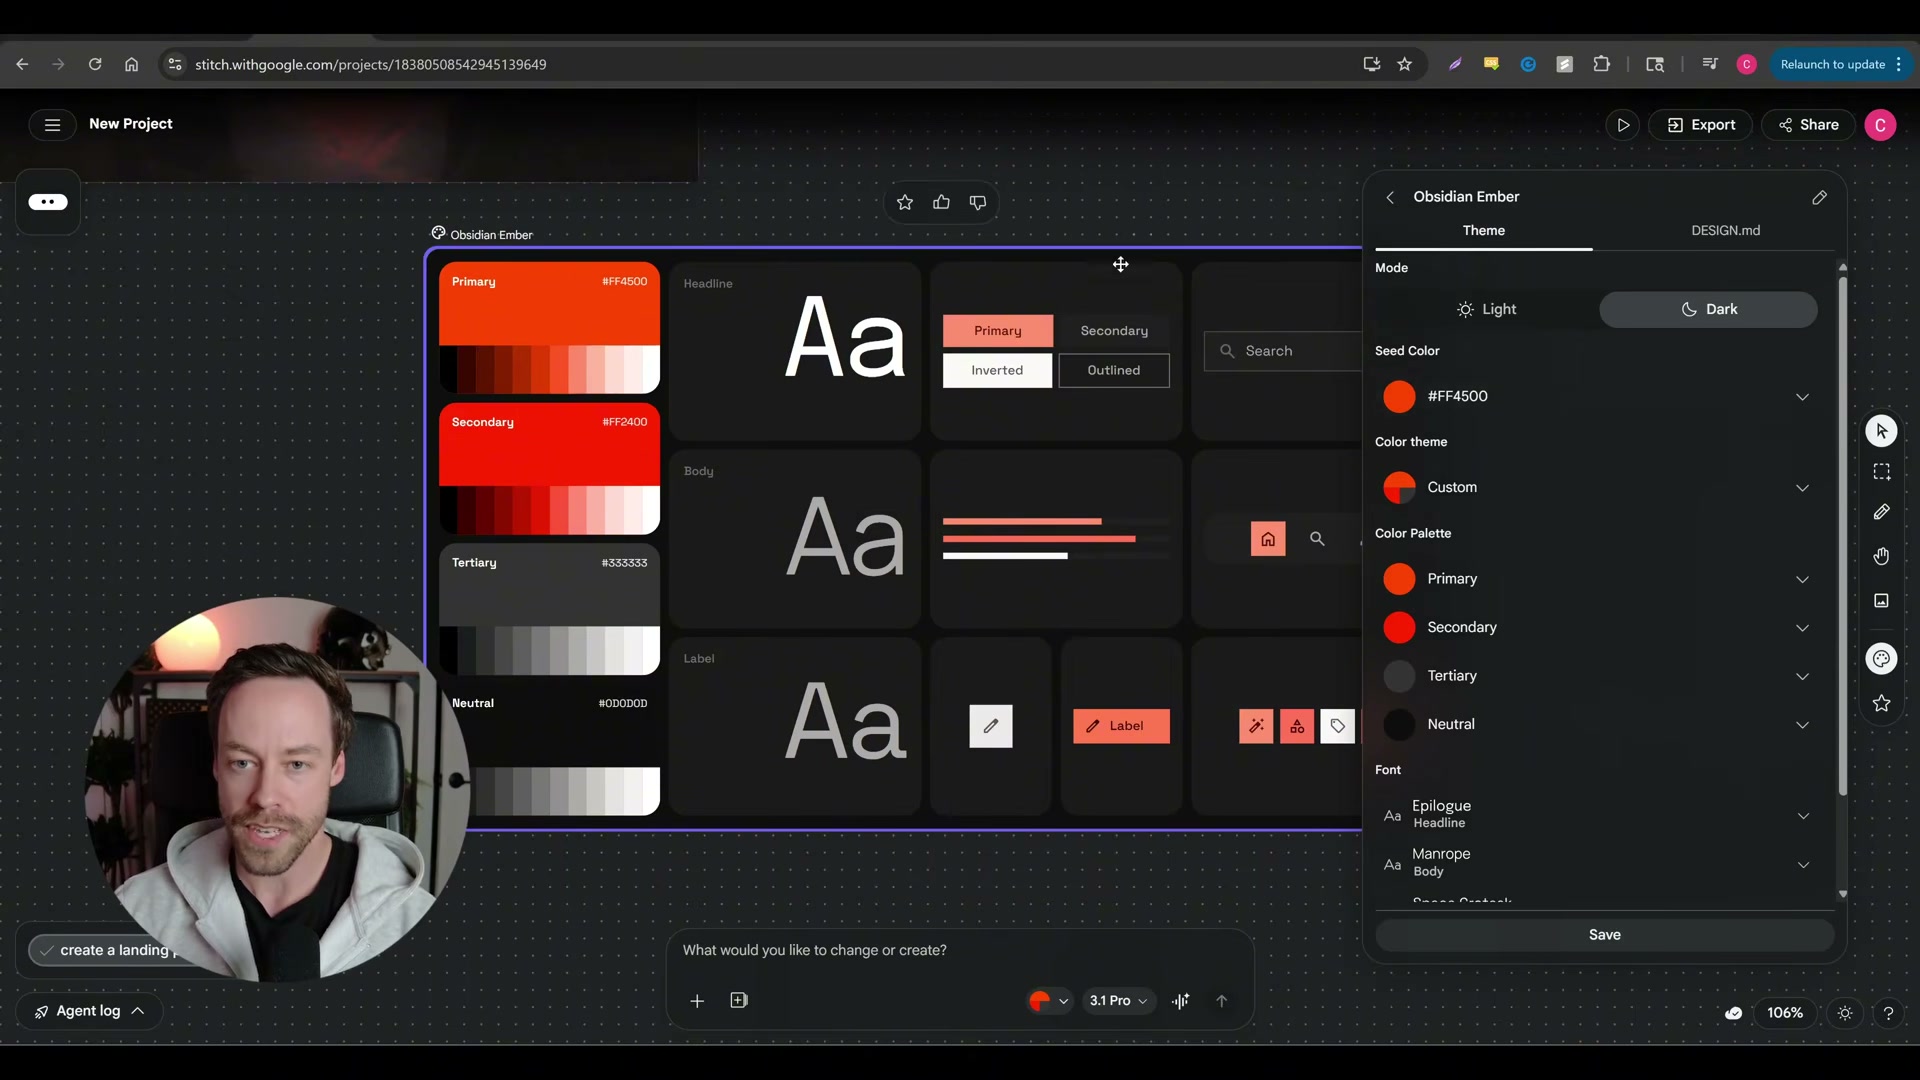
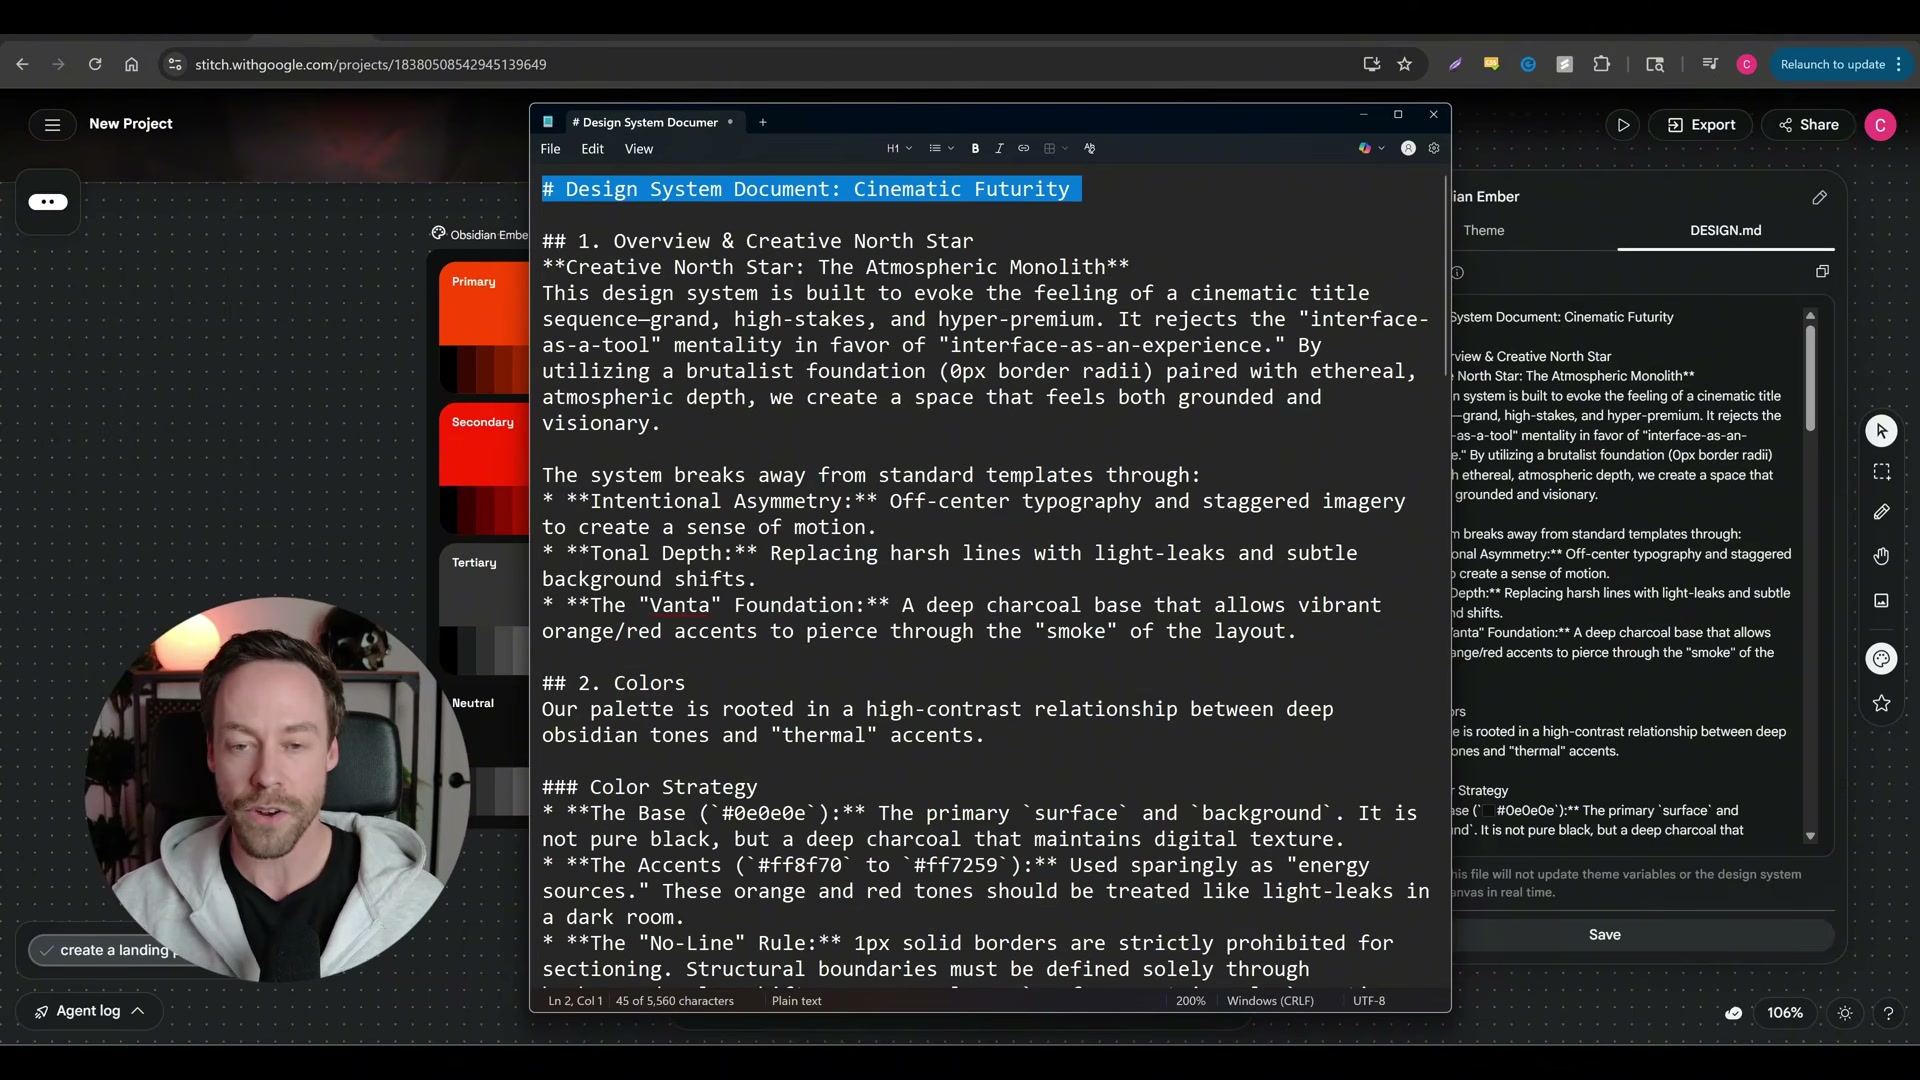
7. Expand the DESIGN.md artifact generated alongside the canvas. This structured markdown document captures every design decision — color strategy, typography rationale, layout constraints — and becomes the handoff file you pass to Claude Code to enforce visual consistency.
8. Right-click any frame and choose Regenerate for a fresh pass, or select Variants to open the Generate Variations panel. Set the number of options to 3, push the Creative range slider toward Reimagine, and check the dimensions to mutate — layout, color scheme, images, or typography.

9. Use the pencil icon to click directly into individual components and edit them in place. For broader, conversational feedback, activate Live Mode — Stitch watches your screen and accepts real-time spoken or typed instructions.
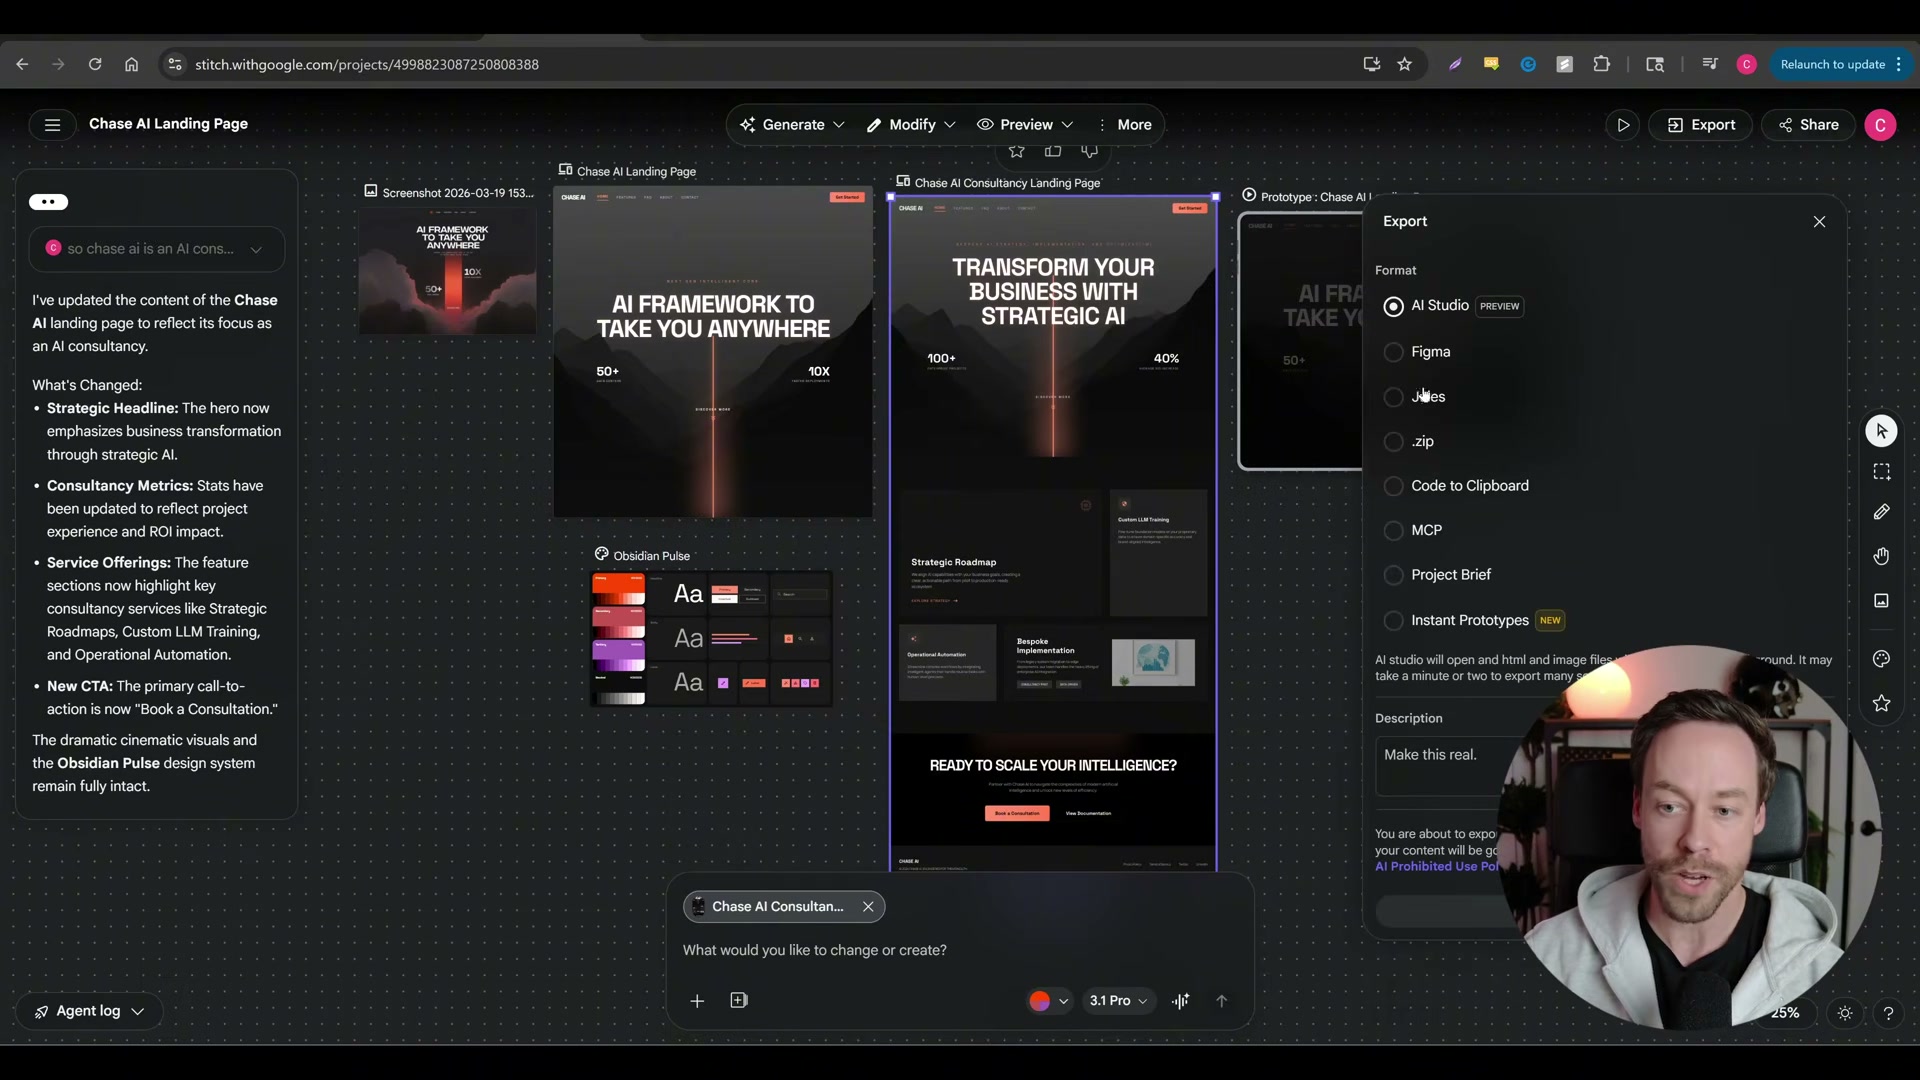
10. Once the design is locked, click the frame, then go to More → Export → Code to Clipboard. The full front-end code for that frame copies to your clipboard instantly.
11. Open Claude Code, paste the copied code, and add a prompt instructing it to build the landing page. Iterate from there — swap in component libraries like 21st.dev for polished UI primitives, then push the finished build to GitHub and deploy via Vercel.
How does this compare to the official docs?
The steps above reflect one practitioner’s fast path through Stitch and Claude Code — Act 2 cross-references each stage against Google’s official Stitch documentation to surface what’s changed, what’s missing, and where the verified approach diverges from what the video shows.
Here’s What the Official Docs Show
The video gives you a solid working framework for the Stitch-to-Claude Code pipeline — the screenshots below fill in a few platform updates and access details that have changed since recording. None of these gaps break the workflow; they just save you a wrong turn or two.
Step 1 — Navigate to Stitch and switch to Web mode
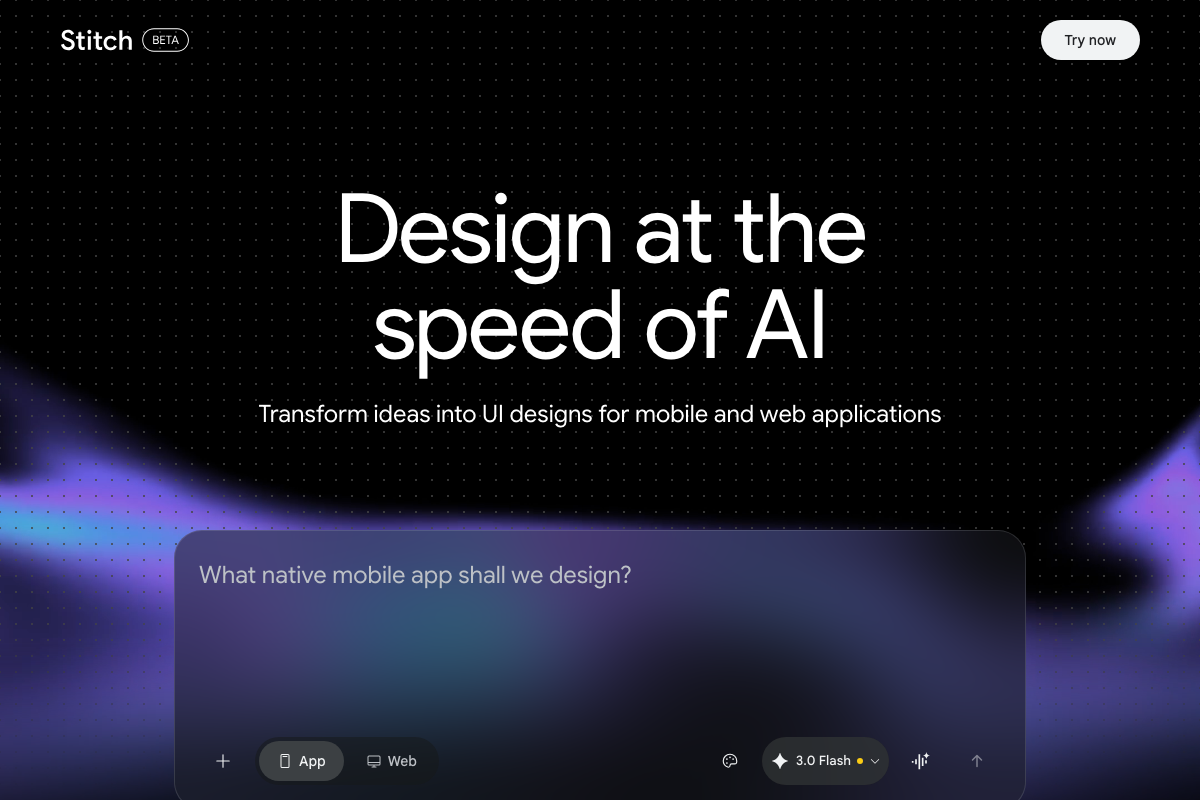
The video’s approach here matches the current docs exactly on destination: stitch.withgoogle.com is live. Two things to know before you start: Stitch carries a BETA badge in the top-left corner — feature availability may vary — and the interface loads in App mode by default. The chat placeholder reads “What native mobile app shall we design?” You must click the Web tab in the bottom toolbar before entering your prompt.
Step 2 — Choose a model
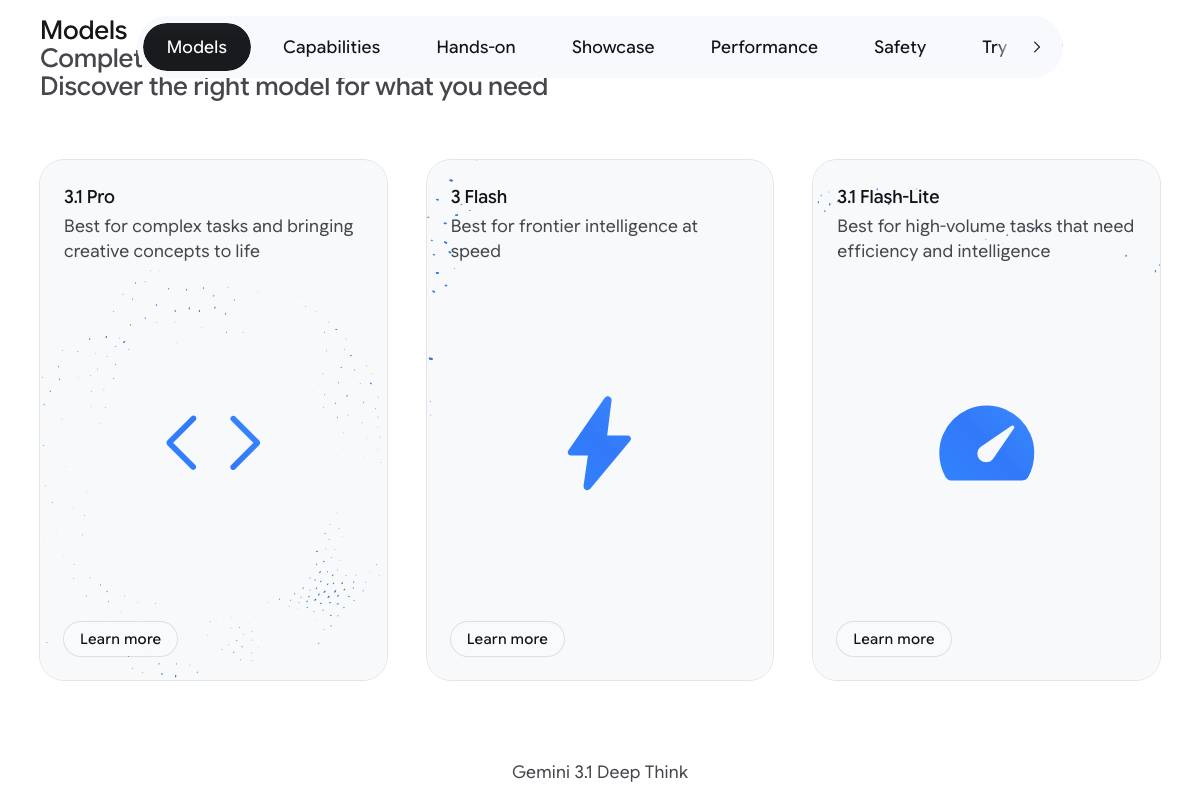
As of March 20, 2026, the model selector in Stitch shows 3.0 Flash as the active model — “Gemini 2.5 Pro” does not appear in the current interface or in Google DeepMind’s published model lineup, which has advanced to a Gemini 3.x series (3.1 Pro, 3 Flash, 3.1 Flash-Lite). The video’s underlying advice holds: Google DeepMind documents 3.1 Pro as “best for complex tasks and creative work” while 3 Flash is optimized for speed. Select the highest Pro tier shown in the Stitch dropdown.
Step 3 — Gather design inspiration
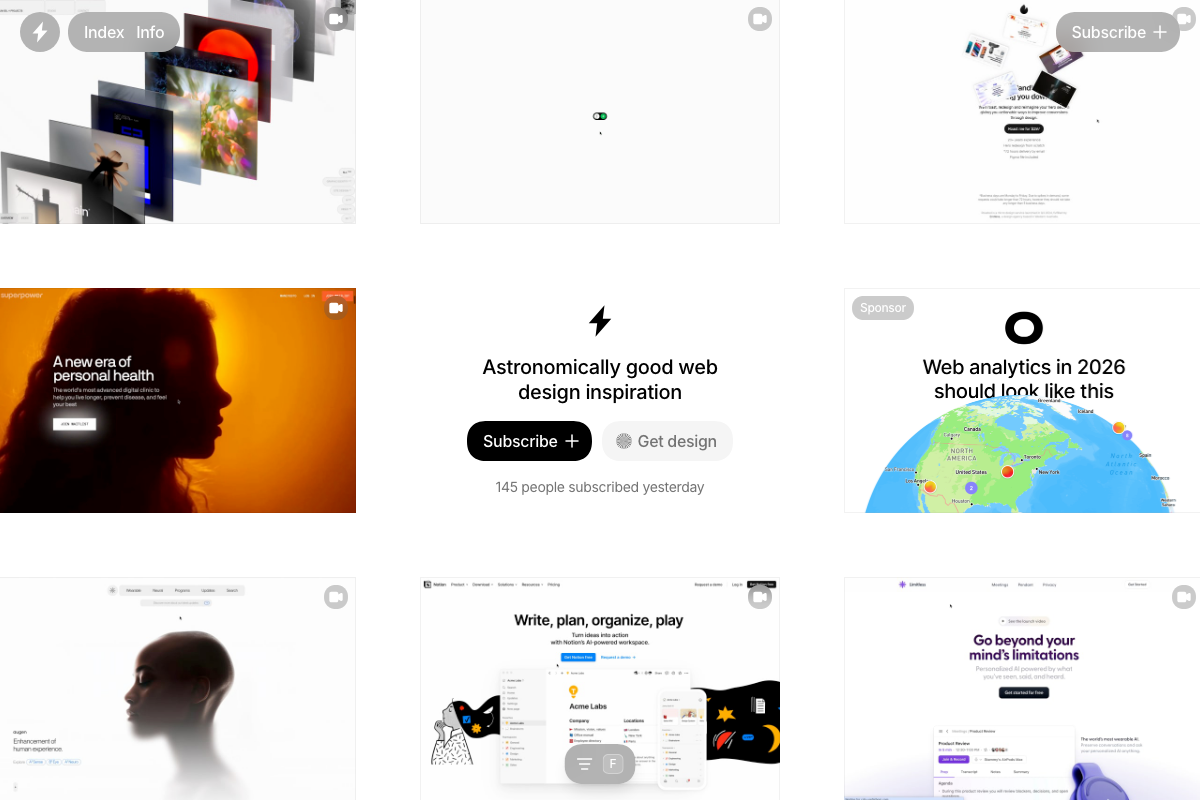
The video’s approach here matches the current docs exactly. Pinterest, Dribbble, and Godly are all accessible. One navigation note: Pinterest defaults to lifestyle content on load — search “landing page” or “web UI” before browsing. Dribbble surfaces “landing page” as a homepage popular tag, making it the most immediately navigable. Godly is the most targeted option, displaying full-page web compositions rather than isolated design assets.

Steps 4–10 — Prompting, design system, variants, and export
No official documentation was found for these steps — proceed using the video’s approach and verify independently.
Step 11 — Claude Code, 21st.dev, GitHub, and Vercel
The video directs you to claude.ai/code for Claude Code. As of March 20, 2026, that URL surfaces Cowork — a separate web-based task product — not the Claude Code CLI. The Claude Code CLI is a terminal-based agentic coding tool; installation instructions are at docs.anthropic.com/en/docs/claude-code/overview. Before you start: Claude plans run Free ($0), Pro ($17/mo annual), and Max (from $100/mo). Full Stitch landing page exports can be token-heavy — a Pro plan is the practical minimum for this step.


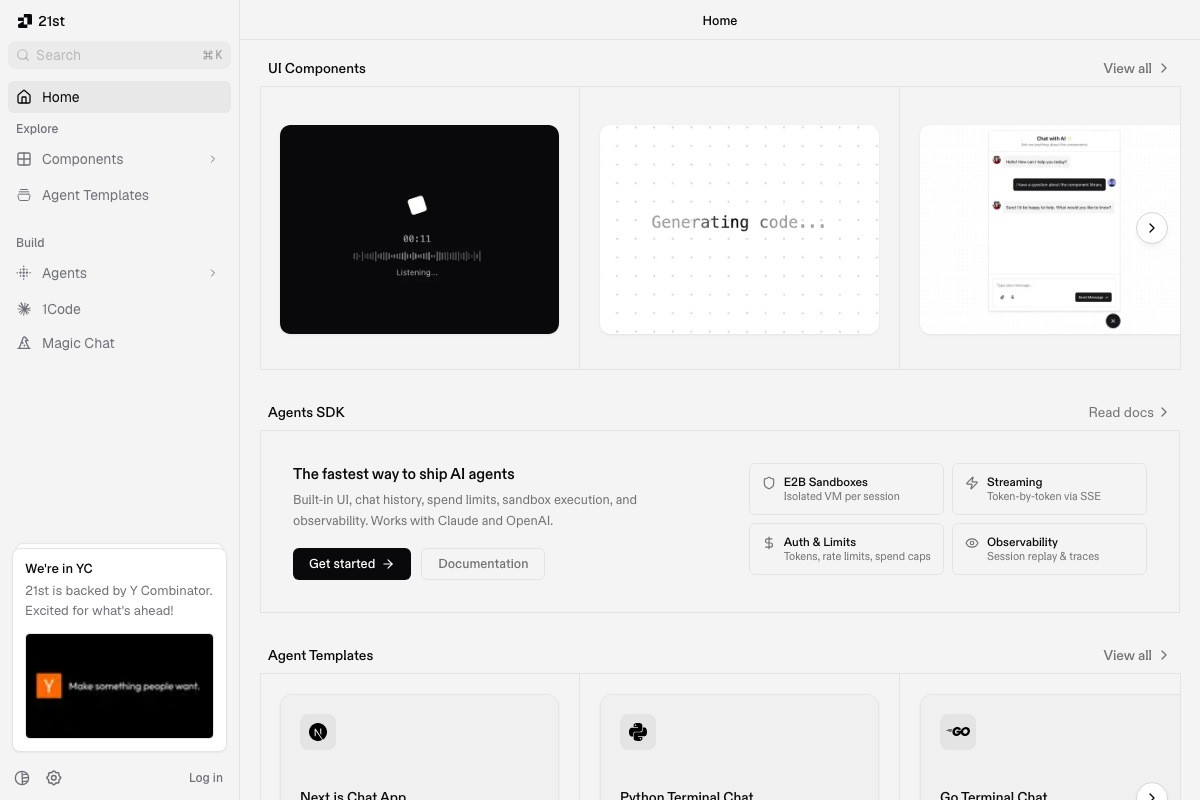
For 21st.dev: the video’s approach here matches the current docs exactly for accessing UI components. Worth knowing: the platform has expanded well beyond a component library — it now includes an Agents SDK, Agent Templates, E2B sandboxes, and observability tools. For the tutorial use case, go directly to Components in the left sidebar and filter for your target element type.
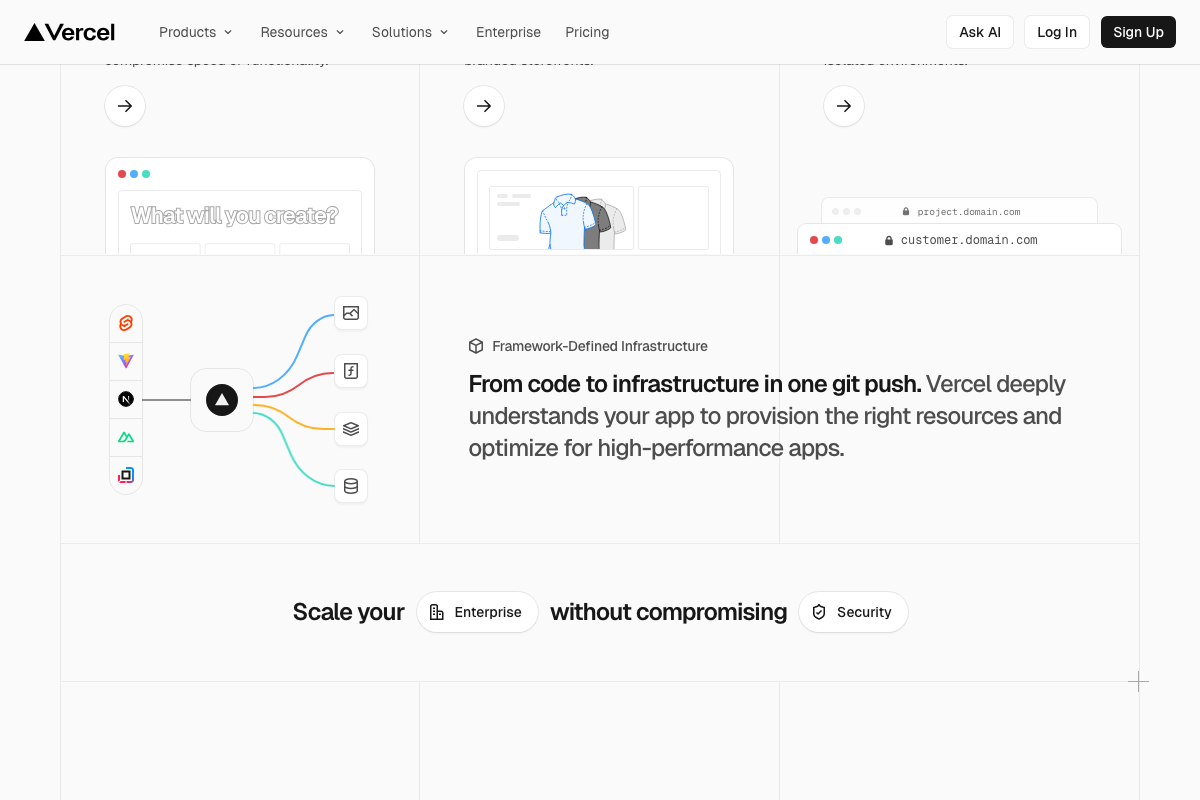
For GitHub and Vercel: the video’s approach here matches the current docs exactly. One shortcut worth taking: connect your GitHub repo to Vercel once and deployment triggers automatically on every subsequent push, collapsing the tutorial’s two sub-steps into one.
Useful Links
- Stitch – Design with AI — Google’s AI design tool for generating web and mobile UI mockups from prompts and image references
- Gemini 3 — Google DeepMind — Official Google DeepMind page listing current Gemini model tiers and capability positioning
- Pinterest — Visual inspiration platform; search “landing page” or “web UI” to surface design-relevant content
- Dribbble – Discover the World’s Top Designers & Creative Professionals — Designer portfolio platform with “landing page” as a searchable homepage tag
- Godly – Astronomically good web design inspiration — Web-design-specific inspiration grid displaying full-page site compositions
- Claude Code — Claude.ai platform entry point; the Claude Code CLI is documented separately at docs.anthropic.com/en/docs/claude-code/overview
- 21st: Infrastructure and UI building blocks for the agentic internet — UI component library and agentic development platform backed by Y Combinator
- GitHub · Change is constant. GitHub keeps you ahead. — Code repository hosting with built-in Copilot Chat and CI/CD via GitHub Actions
- Vercel: Build and deploy the best web experiences with the AI Cloud — Deployment platform with one-git-push GitHub integration and a first-class Marketing deployment category


Hurrah! Finally I got a blog from where I can genuinely take helpful facts concerning my study
and knowledge.