

WebMCP (Web Model Context Protocol) is a proposed browser-native standard that lets any webpage expose its capabilities as structured, callable tools for AI agents—turning your site into an API without building or maintaining a separate one. Jointly developed by Google Chrome and Microsoft Edge engineers through the W3C Web Machine Learning Community Group, it’s the infrastructure layer that will determine which websites AI assistants can actually interact with, and which ones get skipped entirely. This tutorial covers what WebMCP is, why it rewires web visibility for marketers and developers alike, and exactly how to implement it starting today.
What This Is
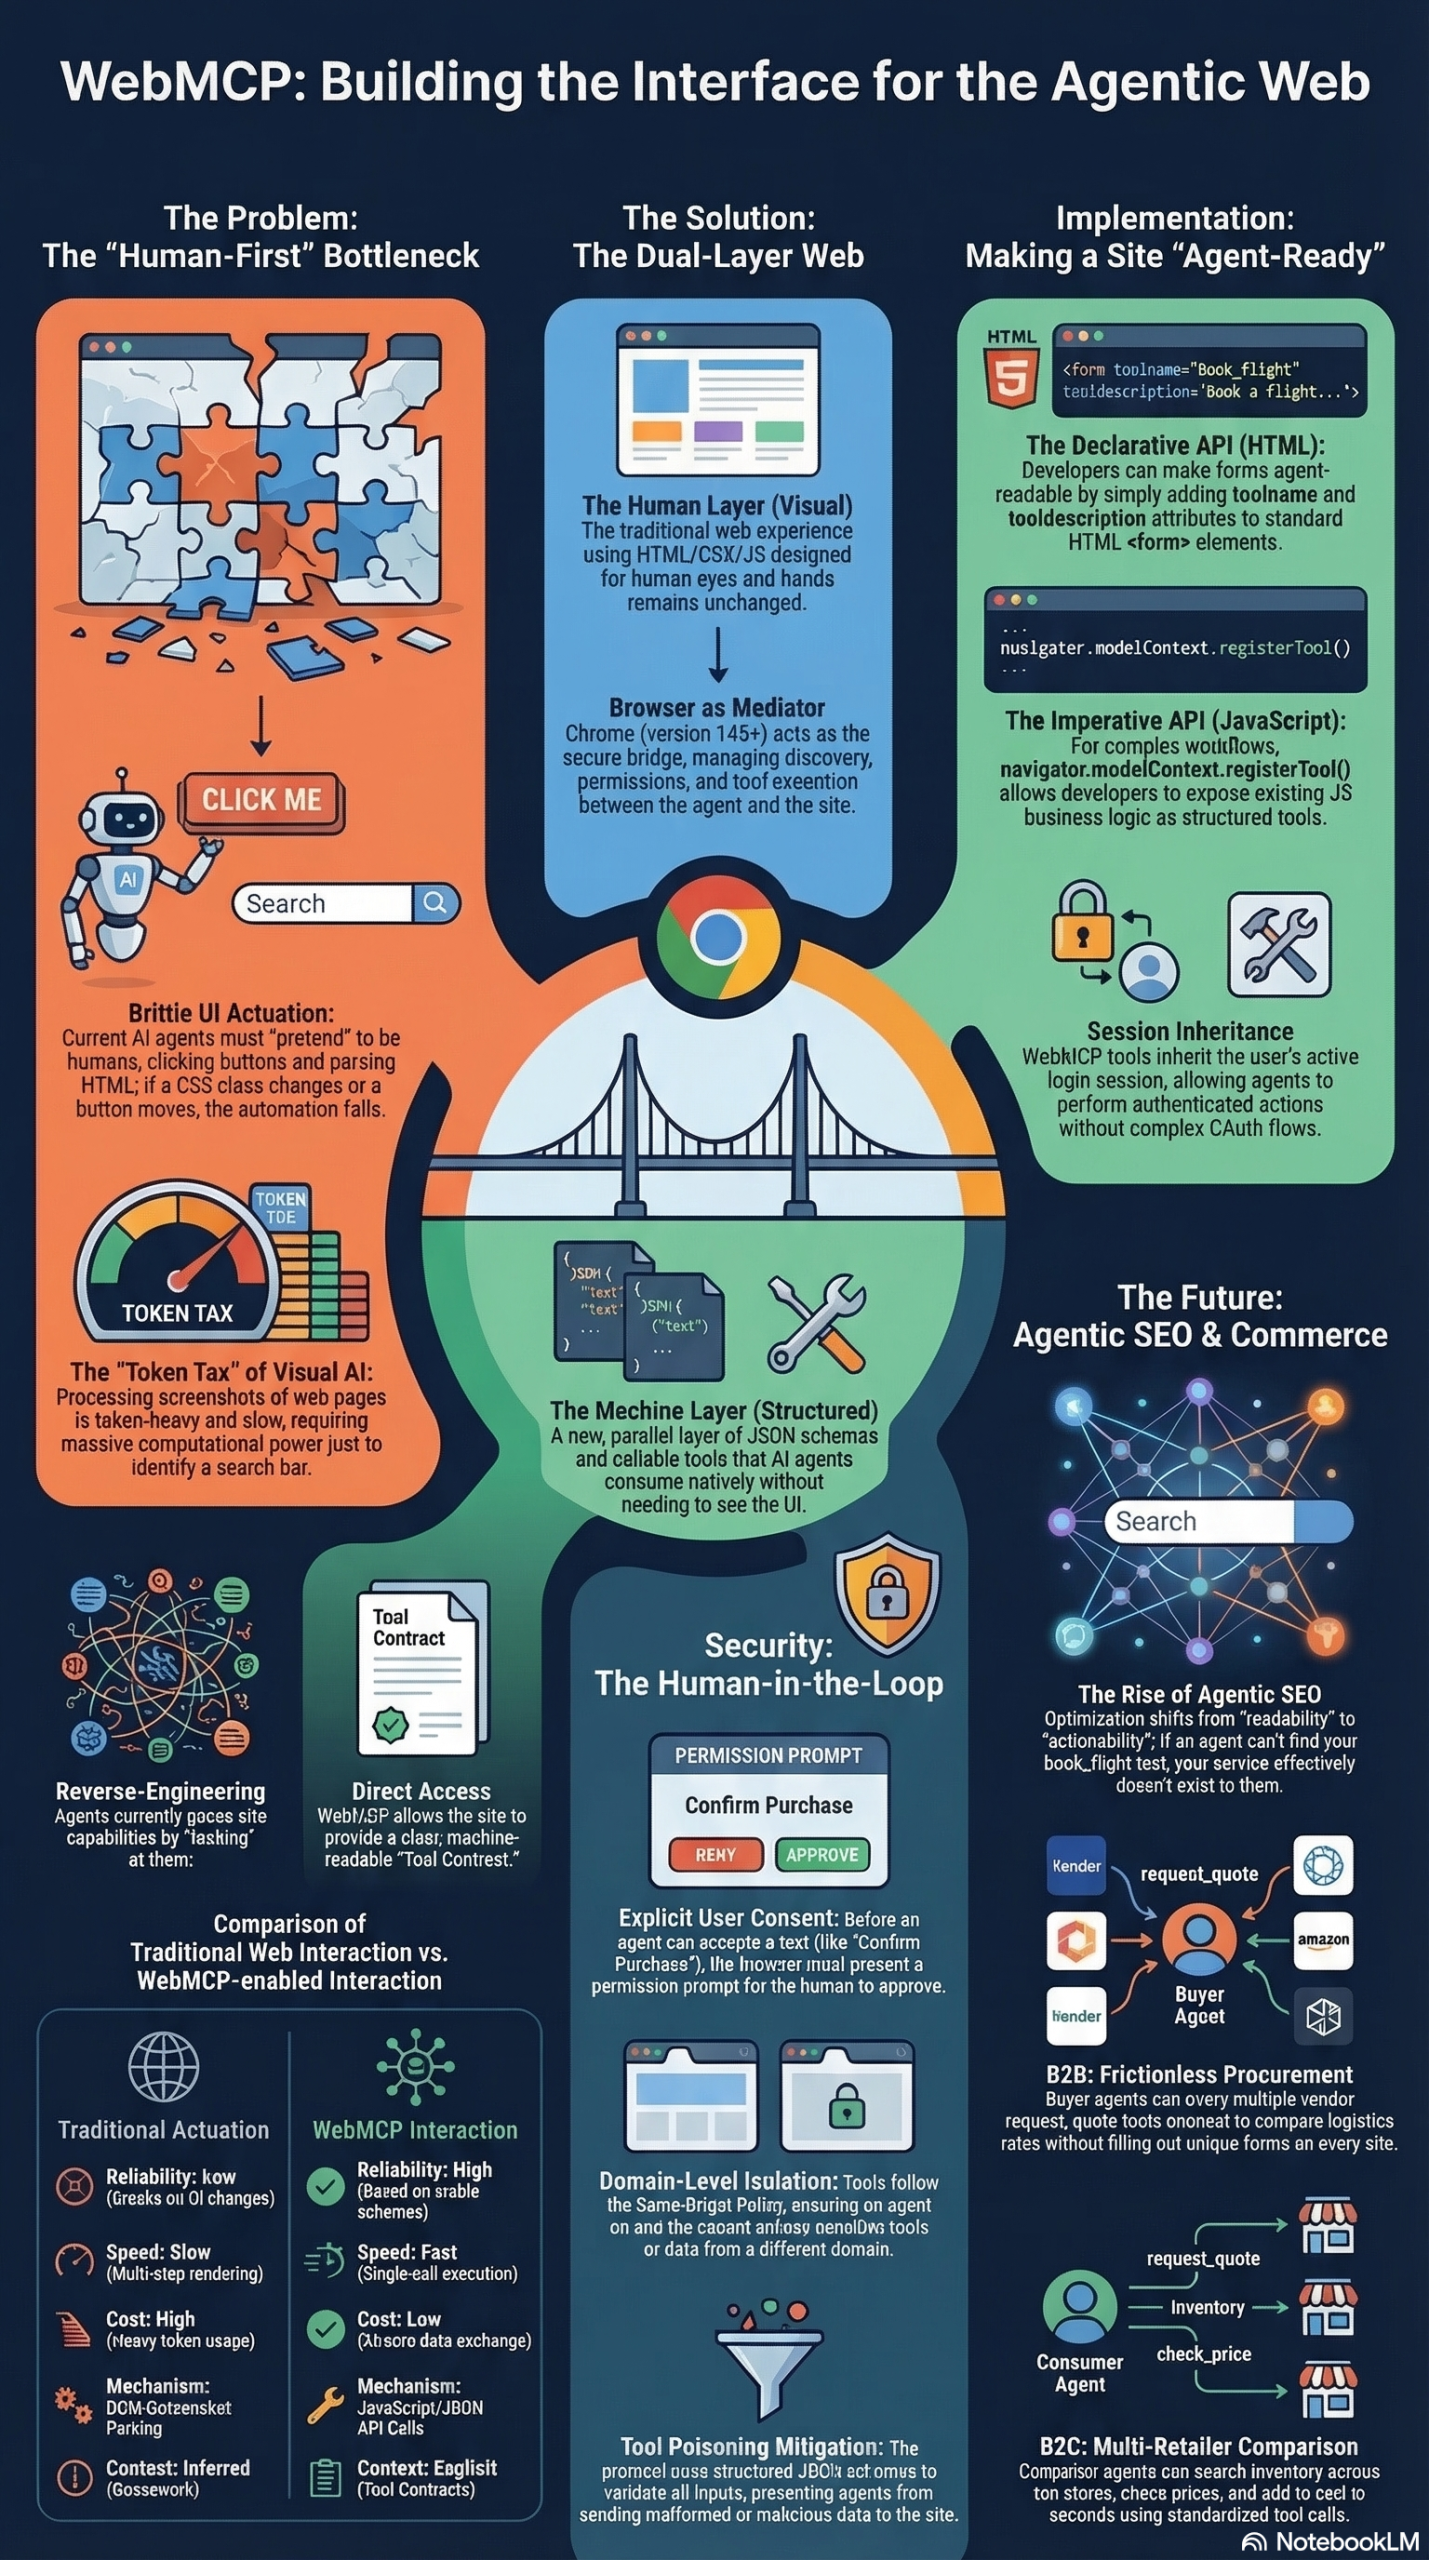
As of early 2026, AI agents are proliferating fast. Google’s Chrome Auto Browse, OpenAI’s Atlas Agent Mode, Perplexity’s Comet, and Google Labs’ Disco are all capable of navigating the open web autonomously on a user’s behalf. The problem? All of them currently do it the hard way: taking screenshots, parsing raw HTML, and guessing where the “Book Now” button lives. That approach is brittle by design.
WebMCP, described by Google’s André Cipriani Bandarra as a way to provide “a standard way for exposing structured tools, ensuring AI agents can perform actions on your site with increased speed, reliability, and precision,” solves this by introducing a parallel machine-readable layer directly into the browser.
Here’s the core mechanic: a developer adds a new browser API—navigator.modelContext—to their web page. That API exposes a list of explicitly defined functions (think search_inventory, book_flight, checkout) that an AI agent can discover, read the schema for, and call directly. No screenshots. No DOM guessing. A clean, structured contract between your site and any AI agent that visits.
According to the NotebookLM research report compiled from the primary sources, WebMCP introduces a dual-layer architecture:
- The Human Layer: The traditional HTML/CSS/JS interface your visitors see and click.
- The Machine Layer: A structured, schema-driven programmatic layer that AI agents consume natively.
Both layers coexist on the same page. Your visual branding, UX, and content remain exactly as-is for human visitors. The machine layer is additive—it’s a new surface area, not a replacement.
The spec is currently available as an early preview in Chrome 146 Canary (version 146.0.7672.0 or higher). It is not yet production-ready, and the specification is still actively evolving through the W3C process. Broader browser support from other vendors is expected by mid-to-late 2026, per Semrush’s reporting on the standard.
The “USB-C of AI agent interactions” analogy—coined by Google’s Anand Sagar—captures the ambition here: one standardized interface replacing the current tangle of proprietary scraping strategies used by each AI platform. Just as USB-C ended the cable chaos, WebMCP aims to end the fragmentation in how agents navigate the web.
Why It Matters
The practical stakes here go well beyond developer convenience. This is a visibility problem at its core.
AI assistants—Gemini, Claude, ChatGPT—are increasingly acting as the first point of contact between a user and the web. A user says “find me a flight from Chicago to Lisbon under $700 and book it.” The agent browses on their behalf. If your airline’s booking flow can’t be reliably parsed or executed by an agent, your site gets bypassed. Not demoted. Bypassed entirely.
As Semrush’s reporting frames it: “The sites that make it easy for agents to complete tasks will capture more of this traffic. The ones that don’t will get skipped.”
Barry Schwartz at Search Engine Land put it more bluntly, calling the agentic shift “the biggest shift in technical SEO since structured data.” That comparison is apt. Structured data (schema.org) made pages machine-readable for crawlers. WebMCP makes pages machine-executable for agents.
The research report identifies three distinct groups who should be paying attention right now:
For developers and engineers: WebMCP is an additive implementation. The declarative path requires nothing more than HTML attribute additions to existing forms. The imperative path via navigator.modelContext.registerTool() unlocks complex, stateful workflows. Either way, the lift is lower than building and maintaining a dedicated API endpoint.
For SEO and marketing professionals: SEO is shifting from “discovery-centric” (can humans find this?) to “action-centric” (can agents do this?). The quality of your JSON Schema definitions and the natural language descriptions of your tools will become ranking signals in the agentic era. Clear, specific verbs like reserve_table beat vague ones like submit_form.
For business and strategy leaders: The research report introduces the concept of “agent invisibility”—sites that are structurally incompatible with agents will lose traffic as AI assistants become primary traffic drivers. The window to establish early mover advantage is open now, not after the spec is finalized.
There’s also an important sequencing point. Agents must discover your brand before they can use your site. AI visibility (citations and mentions in AI-generated responses) precedes agent functionality. As Semrush puts it: “Getting mentioned and cited today is how you earn the right to be executed on tomorrow.”
The Data
WebMCP vs. Traditional MCP: Key Differences
The original Model Context Protocol (MCP) from Anthropic established a client-server architecture for AI tools. WebMCP is a different, complementary standard designed specifically for browser-based interactions. Understanding the distinction is critical before choosing your implementation path.
| Aspect | Traditional MCP | WebMCP |
|---|---|---|
| Architecture | Client-server (JSON-RPC) | Browser-native (in-tab) |
| Runs in | Standalone server | Browser tab |
| Authentication | Requires separate OAuth/API setup | Inherits browser session (SSO, cookies) |
| Page State Access | No direct access | Full access |
| Best for | Backend/API operations | Web UI interactions |
| Scope | Tools, Resources, Prompts | Tools only (current spec) |
| Status | Widely adopted | Early preview (Chrome 146) |
Current Agentic Browser Products (March 2026)
These are the AI agents that WebMCP is designed to serve, per Semrush’s reporting:
| Product | Company | Launch | Capability |
|---|---|---|---|
| Chrome Auto Browse | January 2026 | Gemini-powered autonomous browsing | |
| Atlas (Agent Mode) | OpenAI | October 2025 | Multi-step task execution |
| Comet | Perplexity | July 2025 | Search-first agentic browsing |
| Disco | Google Labs | December 2025 | Custom app generation from tabs |
Implementation Complexity Comparison
Both paths to WebMCP serve different technical contexts, as documented in the research report:
| Feature | Declarative API | Imperative API |
|---|---|---|
| Primary Use | Standard HTML forms | Complex, dynamic JS workflows |
| Implementation | Attributes on <form> tags |
navigator.modelContext.registerTool() |
| Key Attributes | toolname, tooldescription, toolautosubmit |
inputSchema, execute handler |
| Complexity | Low — leverages existing semantic HTML | High — supports multi-step state management |
| Who Should Use | Marketing teams, CMS-driven sites | Engineering teams, SaaS products |
Step-by-Step Tutorial: Implementing WebMCP
This walkthrough covers both the declarative and imperative implementation paths, from environment setup through to verification. Follow these steps in sequence.
Prerequisites
Before you start, confirm the following:
- Chrome version 146.0.7672.0 or higher (download Chrome Beta or Chrome Canary)
- Your site served over HTTPS (the
navigator.modelContextAPI is restricted to secure contexts only) - A valid Content Security Policy (CSP) header on your pages
- Basic familiarity with HTML forms (Declarative path) or JavaScript (Imperative path)
Per the research report’s implementation checklist, these are hard requirements—not optional best practices.
Phase 1: Enable WebMCP in Chrome
Step 1: Navigate to Chrome Flags
Open Chrome and go to:
chrome://flags/#enable-webmcp-testing
Step 2: Enable the Flag
Find the “WebMCP for testing” flag and set it to Enabled using the dropdown menu.
Step 3: Relaunch Chrome
Click the “Relaunch” button that appears at the bottom of the screen. Chrome must fully restart for the flag to take effect.
Step 4: Install the Inspector Extension
Go to the Chrome Web Store and install the Model Context Tool Inspector extension. This is the debugging tool you’ll use throughout implementation to verify that your tools are being registered correctly and that the schema is well-formed.
Once installed, the extension adds a panel to Chrome DevTools (under the “MCP Tools” tab) that shows all tools currently registered on the active page, their input schemas, and their execution status.
Phase 2: Implementing the Declarative API
The Declarative API is the fastest path to WebMCP compliance. If your site already has HTML forms—contact forms, search bars, booking flows, newsletter signups—you can make them agent-readable in minutes.
Step 5: Identify Your Priority Forms
Audit your site and select the 3-5 forms that represent your highest-value user actions. Think: search, lead capture, checkout, appointment booking, support ticket submission. These are the actions agents will most commonly need to execute on your behalf.
Step 6: Add WebMCP Attributes
For each form, add three attributes to the <form> tag:
<form
  action="/search"
  method="GET"
  toolname="search_products"
  tooldescription="Search the product catalog by keyword, category, or price range. Returns a list of matching products with names, prices, and availability."
  toolautosubmit="true"
>
  <label for="query">Search</label>
  <input type="text" id="query" name="query" placeholder="e.g., wireless headphones under $100">

  <label for="category">Category</label>
  <select id="category" name="category">
    <option value="">All Categories</option>
    <option value="electronics">Electronics</option>
    <option value="audio">Audio</option>
  </select>

  <button type="submit">Search</button>
</form>
Breaking down the three attributes:
toolname: A machine-readable identifier. Use snake_case verbs that are specific to the action (e.g.,reserve_table,submit_support_ticket,add_to_cart). This is what the agent calls internally. Per the research report, generic names likesubmit_formreduce agent selection likelihood when competing tools are available.tooldescription: Natural language explanation of what the tool does, what parameters it accepts, and what it returns. Write this for an AI reading it—complete sentences, specific verbs, clear output expectations.toolautosubmit: Set to"true"to allow the agent to submit the form without an additional user confirmation step. Set to"false"(or omit) if you want human-in-the-loop confirmation before submission.
Step 7: Verify with the Inspector
Open DevTools → MCP Tools tab. Refresh the page. You should see your form’s tool registered with the name and description you specified. Click it to inspect the auto-generated JSON Schema—Chrome extracts field types, labels, and constraints from your existing HTML automatically.
If any fields aren’t parsing correctly, check that your <input> elements have proper type attributes (text, email, number, date) and that your <label> tags are explicitly associated via for/id pairs.
Phase 3: Implementing the Imperative API
Use the Imperative API when your high-value interactions can’t be expressed as a single HTML form submit—multi-step workflows, state-dependent operations, or actions that require reading data before writing it.
Step 8: Register a Tool with navigator.modelContext
The following example registers a flight search tool in a React-style component lifecycle:
// Check for API availability first — progressive enhancement
if ('modelContext' in navigator) {
  const tool = {
    name: 'search_flights',
    description: 'Search for available flights between two airports on a specific date. Returns flight options with prices, airlines, departure times, and seat availability.',
    inputSchema: {
      type: 'object',
      properties: {
        origin: {
          type: 'string',
          description: 'Departure airport code (e.g., ORD for Chicago O\'Hare)'
        },
        destination: {
          type: 'string',
          description: 'Arrival airport code (e.g., LIS for Lisbon Humberto Delgado)'
        },
        departure_date: {
          type: 'string',
          format: 'date',
          description: 'Departure date in YYYY-MM-DD format'
        },
        max_price: {
          type: 'number',
          description: 'Maximum price in USD (optional)'
        }
      },
      required: ['origin', 'destination', 'departure_date']
    },
    execute: async (params) => {
      const response = await fetch(`/api/flights?${new URLSearchParams(params)}`);
      const data = await response.json();
      return {
        flights: data.results,
        count: data.results.length,
        currency: 'USD'
      };
    }
  };

  // Register the tool
  const toolHandle = await navigator.modelContext.registerTool(tool);

  // Critical: unregister when component unmounts to prevent context bloat
  return () => toolHandle.unregister();
}
Step 9: Handle State Correctly
The research report specifically flags the “stale closure” problem for imperative implementations: if your execute handler closes over state that updates after registration, it will work with outdated data. The recommended pattern is “ref-based state bridges”—storing mutable state in a useRef (React) or equivalent, then accessing .current inside the execute handler rather than closing over the state variable directly.
// Problematic — stale closure
const [filters, setFilters] = useState({});
execute: async (params) => {
  // `filters` captured at registration time, won't reflect updates
  return fetchWithFilters(params, filters);
}

// Correct — ref-based bridge
const filtersRef = useRef({});
useEffect(() => { filtersRef.current = filters; }, [filters]);
execute: async (params) => {
  // Always reads current value
  return fetchWithFilters(params, filtersRef.current);
}
Step 10: Keep Tools Atomic
Per the research report’s actionable insights, each tool should do exactly one thing. Don’t build a complete_booking_workflow tool that handles search, selection, and payment in one function. Instead, register three separate tools: search_flights, select_flight, and process_payment. Atomic, composable tools are easier for agents to sequence correctly and easier for users to grant permissions for granularly.
Phase 4: Test the Full Agent Lifecycle
Step 11: Test with Google’s Live Demo
Before testing your own implementation, run through Google’s reference demo at:
googlechromelabs.github.io/webmcp-tools/demos/react-flightsearch/
This shows the full discover → read schema → execute flow in action. Open DevTools → MCP Tools while on the demo page to see what a correctly registered tool looks like before you debug your own.
Step 12: Simulate Agent Calls
Use the Model Context Tool Inspector extension to manually trigger your registered tools. Enter test parameter values in the tool’s input panel and click “Execute.” Verify:
– The tool receives correct parameter types
– The execute handler returns well-formed JSON
– The tool unregisters cleanly when you navigate away (check the MCP Tools panel on another page—your tool should be gone)
Step 13: Verify Security Requirements
Confirm your site has:
– HTTPS enforced (no mixed content)
– A Content-Security-Policy header that doesn’t block inline scripts (or properly allows your tool registration scripts via nonce or hash)
– No tools that expose data outside their registered origin’s scope
Expected Outcomes
After completing this tutorial, you will have:
– At least one agent-callable tool registered on your site’s highest-value form or workflow
– Verified tool registration via the Model Context Tool Inspector
– A working understanding of the security model and permission prompt behavior
– A foundation to extend to additional tools as the spec matures toward production readiness
Real-World Use Cases
Use Case 1: E-Commerce Checkout Automation
Scenario: A mid-size apparel retailer wants their product catalog and checkout flow accessible to AI shopping assistants.
Implementation: The developer adds the Declarative API to the site search form (toolname="search_apparel", with a description that specifies the product types, filter options, and return format). They then use the Imperative API to register add_to_cart and initiate_checkout tools. The cart tool reads from the current session state so agents see the actual cart contents.
Expected Outcome: When a user tells their AI assistant “Find me a blue Oxford shirt, size medium, under $80, and add it to my cart on [Brand],” the agent can execute the full sequence without a single screenshot. Conversion rates from agent-initiated sessions improve because the agent completes the task rather than abandoning after a parsing failure.
Use Case 2: B2B SaaS — Lead Qualification Forms
Scenario: A marketing analytics SaaS company wants AI agents to be able to request demos and trial signups on behalf of potential customers.
Implementation: The Declarative API is applied to the demo request form. The tooldescription is written to specify that the tool accepts company name, use case, team size, and primary analytics goal—and that it returns a confirmation with a booking link. The toolautosubmit is set to "false", requiring user confirmation before the form submits.
Expected Outcome: AI agents browsing on behalf of a prospect can initiate the demo request flow, pre-fill the form based on what they know about the user’s context, and pause for confirmation. The human-in-the-loop consent model, as described in the research report, ensures no form is submitted without explicit user approval.
Use Case 3: Travel Booking — Multi-Step Itinerary Building
Scenario: An online travel agency wants to compete with direct booking tools being used by AI assistants.
Implementation: Using the Imperative API, the engineering team registers three atomic tools: search_flights, search_hotels, and build_itinerary. Each tool is scoped to the site’s domain and inherits the user’s existing session cookies, eliminating OAuth re-authentication. The build_itinerary tool takes flight and hotel IDs returned by the first two tools and generates a combined booking summary.
Expected Outcome: A user asking their AI agent to “plan a 5-day trip to Lisbon in June under $2,000” can have the agent use all three tools in sequence to assemble a complete itinerary, with the user reviewing and confirming the final booking. The session inheritance model, noted in the research report, means users don’t face additional login steps.
Use Case 4: Customer Support — Ticket Creation
Scenario: A software company wants AI agents to be able to submit support tickets on behalf of frustrated users who describe a problem in natural language.
Implementation: The support ticket form gets Declarative API treatment with a rich tooldescription that specifies the severity levels, product categories, and expected response time fields. The toolautosubmit is set to "true" since ticket creation is low-risk and high-friction to abandon mid-flow.
Expected Outcome: A user tells their AI assistant “Submit a support ticket to [Company] about my dashboard not loading—high priority, it’s affecting my whole team.” The agent finds the tool, maps the natural language description to the correct form fields, and submits without the user having to navigate to the support portal at all.
Common Pitfalls
Pitfall 1: Vague Tool Descriptions
The most common mistake in early WebMCP implementations is writing tooldescription text that mirrors the page heading rather than describing the tool’s function, parameters, and output. “Contact us” tells an agent nothing about what data to send or what happens next. Write descriptions that could stand alone in an API documentation page: specify inputs, outputs, and constraints. Per the research report, the quality of JSON Schema and natural language descriptions will directly determine agent selection rates when competing tools are available.
Pitfall 2: Registering Too Many Tools at Once
Dumping fifteen tools on an agent’s context window at page load creates cognitive overhead for the agent and performance overhead for the browser. Follow the atomic tool principle: register only what’s relevant to the current page state. Use dynamic registration/unregistration tied to component lifecycle or route changes to keep the active tool set minimal and precise.
Pitfall 3: Skipping the Unregister Step
Failing to unregister tools when a component unmounts causes “agent context window bloat”—stale tools remain registered even when the underlying UI has disappeared. This leads to agents calling tools that no longer have a valid execution context, producing errors or unexpected behavior. Always pair every registerTool() call with a corresponding toolHandle.unregister() in your cleanup logic, as flagged in the research report’s implementation checklist.
Pitfall 4: Ignoring the HTTPS Requirement
navigator.modelContext is only available in secure contexts. Any page served over HTTP—even for internal testing—will simply not expose the API. If you’re testing locally, use localhost (which is treated as secure) or set up a local HTTPS certificate. Don’t assume that flag-enabling in Chrome is sufficient if your pages aren’t HTTPS.
Pitfall 5: Assuming WebMCP Replaces AI Visibility Work
WebMCP is an action layer, not a discovery layer. Agents must find your site before they can use your tools. If your brand isn’t being cited in AI-generated responses today, WebMCP implementation won’t solve that problem. The research report is clear: AI visibility (mentions, citations) precedes agent functionality. Both tracks need to run in parallel.
Expert Tips
Tip 1: Write Tool Descriptions for Agents, Not Humans
Your tooldescription attribute is read by an AI model, not a person. Write it like you’re writing a concise docstring for an API: “Searches the product catalog. Accepts keyword (string), category (string, optional), and max_price (number, optional). Returns an array of matching products with name, SKU, price, and in-stock status.” The more specific you are about parameter semantics and return shape, the more reliably agents can select and invoke your tool correctly.
Tip 2: Use Specific Action Verbs in Tool Names
The research report explicitly recommends reserve_table over submit_form and add_to_cart over update_basket. Agents use tool names as intent signals. A name that maps cleanly to a user’s stated goal (e.g., “book a table for two”) will be selected over a generic name that requires additional reasoning.
Tip 3: Audit Your Form Hygiene Before Adding Attributes
Forms with unlabeled inputs, missing for/id associations, or ambiguous name attributes will generate poorly-structured auto-schemas in the Declarative API. Before adding WebMCP attributes, run your forms through Chrome’s accessibility audit (DevTools → Lighthouse → Accessibility). Clean form semantics produce clean tool schemas.
Tip 4: Differentiate Agent Traffic in Your Analytics
Once agents start using your tools, your analytics will show sessions with unusual behavioral patterns—no scroll, no hover, immediate form submission. Set up a custom dimension or event parameter to track tool-execution events separately from human interactions. This gives you accurate data on agent-driven conversion rates, which will increasingly matter for ROI attribution as agentic traffic grows.
Tip 5: Monitor the W3C Specification Progress
WebMCP is in active development. Breaking changes to the spec before production release are possible. Subscribe to the W3C Web Machine Learning Community Group mailing list and the Chrome Platform Status page for WebMCP to track changes before they ship. Building on a moving spec without monitoring it is a maintenance debt trap.
FAQ
Q1: Is WebMCP production-ready right now?
No. As of March 2026, WebMCP is an early preview available only in Chrome 146 Canary behind a feature flag. The W3C specification is still actively evolving, and no browser has committed to a production release timeline. Use this period for experimentation, team education, and auditing your existing forms for agent-readiness. Per Semrush’s reporting, broader browser support is expected by mid-to-late 2026.
Q2: How does WebMCP handle authentication? Do agents need their own credentials?
No separate credentials are required. WebMCP agents inherit the user’s existing browser session—including cookies, SSO tokens, and authentication state. If a user is logged into their account on your site, the agent operates within that authenticated context automatically. The research report notes this eliminates the need for complex OAuth flows that traditional MCP server setups require.
Q3: What happens on browsers that don’t support WebMCP?
Nothing breaks. WebMCP is designed as a progressive enhancement. Browsers without the navigator.modelContext API simply ignore the toolname and tooldescription form attributes (as they do with any unrecognized HTML attribute). Your site’s human-facing functionality is completely unaffected. Always gate imperative API calls with if ('modelContext' in navigator) checks, as shown in the tutorial above.
Q4: How is this different from schema.org structured data?
Schema.org markup tells search crawlers what your content is about—it’s a metadata layer for discovery. WebMCP defines what actions can be performed on your site—it’s a functional layer for execution. They’re complementary. Schema.org helps agents find you; WebMCP helps agents use you. The research report frames this as the “AI Visibility Stack”: traditional SEO → AI citations visibility → agent readiness, each layer building on the previous.
Q5: Will Google’s search ranking be affected by WebMCP implementation?
There’s no confirmed direct ranking signal for WebMCP implementation as of March 2026. However, the research report references Barry Schwartz’s observation that “agentic experiences are shaping the future of search—and possibly SEO” and cites Dan Petrovic calling it the biggest shift in technical SEO since structured data. The indirect effects—increased task completion rates by agents, improved brand citations in AI responses—are likely to compound over time as AI assistants become primary traffic drivers.
Bottom Line
WebMCP is the most significant web infrastructure development since responsive design, and the implementation window is open right now before it reaches production. The Declarative API requires nothing more than three HTML attributes on your existing forms—a two-hour audit and implementation effort that positions your site ahead of the vast majority of the web. The Imperative API unlocks stateful, multi-step agent workflows for teams ready to invest more deeply. Both paths share the same foundational requirement: clean, specific, well-described tool contracts that agents can discover, understand, and execute reliably. Start with an audit of your five highest-value user actions today, instrument them in Chrome Canary, and build the muscle for agentic readiness before the spec ships to production. The sites that establish this foundation now will have a compounding advantage as AI agents become the dominant interface layer between users and the web.


0 Comments