Reverse-Engineer Any Image in ChatGPT With One Sentence
ChatGPT’s image generation has crossed a threshold where the hardest part is no longer the model — it’s knowing what to ask for. This tutorial teaches you how to extract a production-ready image prompt from any reference image using a single sentence, then regenerate something nearly identical in a second chat. By the end, you’ll have a repeatable system for cloning visual styles, ad layouts, and brand aesthetics without writing prompt copy from scratch — and you’ll start developing real fluency in how ChatGPT Images 2.0 responds to language.
-
Find a reference image you want to recreate. Brand ad campaigns work especially well — pull one from Instagram, a brand’s website, or a Google Image search. Screenshot it, crop it to the focal content, and save it to your device. The model handles product photography, typography-heavy layouts, and bold branded compositions reliably.
-
Go to chatgpt.com and open a free account if you don’t have one already. No paid subscription is required for this workflow.
-
Start a new chat and upload your reference image using the attachment icon in the prompt input bar.
- With the image attached, type and send this exact prompt — no special formatting required:
“Analyze this image and then write me a prompt that would get ChatGPT to actually create this image. Reverse engineer the prompt.”
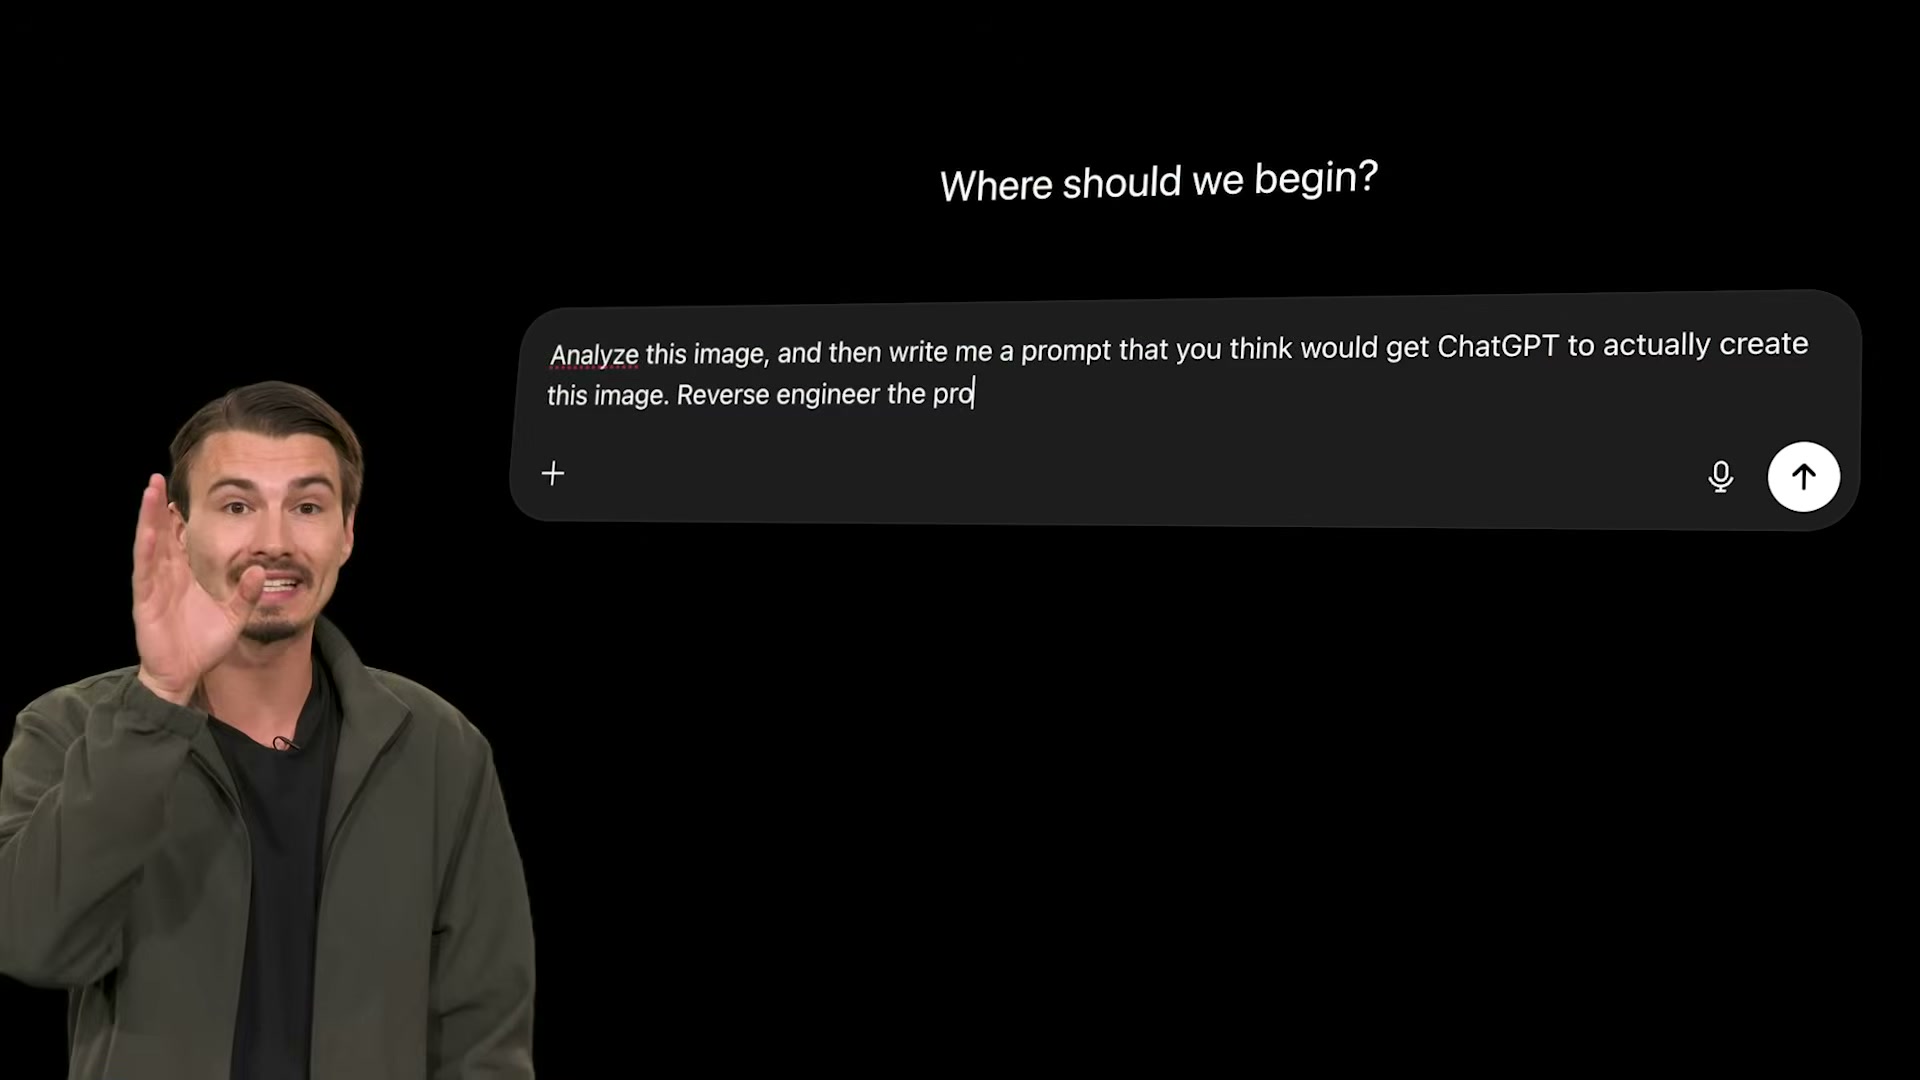
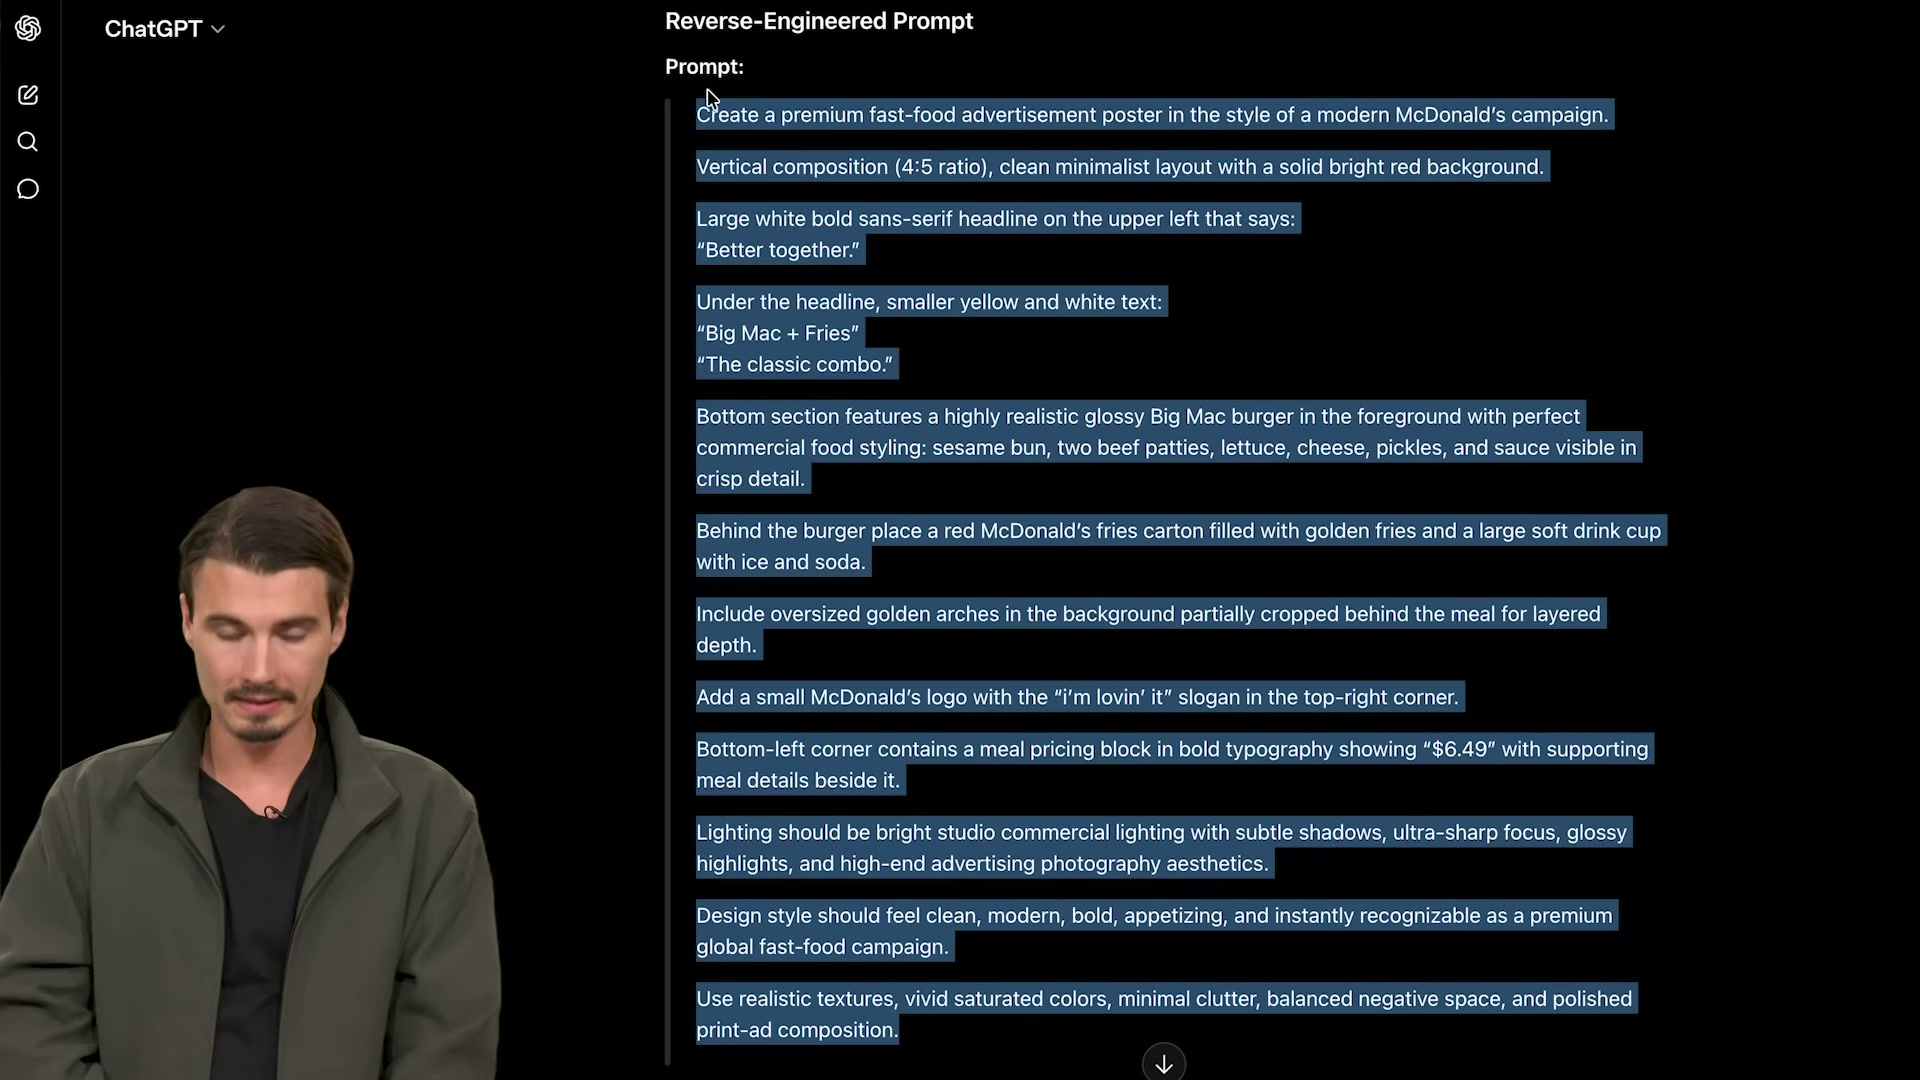
- ChatGPT returns a detailed, structured prompt breaking down composition, lighting, typography, color palette, copy hierarchy, and product placement — essentially a production brief the model can execute directly.
-
Copy the full generated prompt, open a new ChatGPT chat, and paste it in. Starting a fresh chat prevents the reference image from influencing the generation.
-
Hit send. ChatGPT generates the recreated image in seconds. Expect strong alignment on brand feel, color palette, layout, and typography — minor positional differences on individual elements are normal.
-
To personalize the output, edit the generated prompt before sending. Change the brand, swap in your own product details, adjust headline copy, or shift the color palette. The reverse-engineered prompt functions as a structured creative brief you own and can modify freely.
Warning: The transcript notes that OpenAI “silently loosened the restrictions” on the image model’s content policies. These policies can change without public announcement — behavior observable today may not match what the official guidelines currently describe.
How does this compare to the official docs?
OpenAI’s documentation on GPT-4o image generation covers prompt structure, content policy boundaries, and model-specific behavior in ways the video doesn’t address — and those gaps matter if you plan to use this technique in a production workflow.
Here’s What the Official Docs Show
The video’s technique is solid and the step sequence holds up. What follows adds two UI-documented details — one about login requirements, one about a navigation shortcut — that will save you a troubleshooting detour if you’re running this workflow for the first time.
Step 1 — Find a reference image
No official documentation was found for this step — proceed using the video’s approach and verify independently.
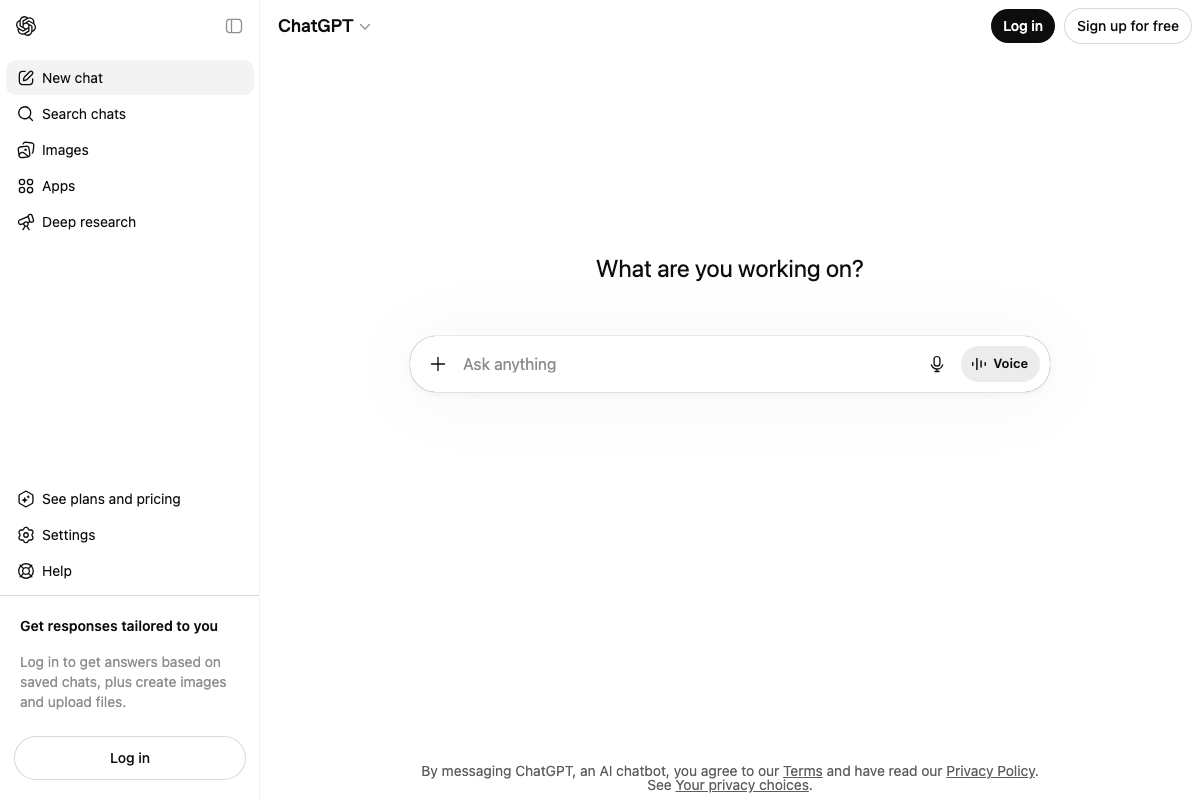
Step 2 — Create a free account at chatgpt.com
The video’s approach here matches the current docs exactly. The “Sign up for free” button is present on the homepage and no paid plan is needed to start.
One addition worth noting: the ChatGPT UI explicitly states, “Log in to get answers based on saved chats, plus create images and upload files.” Having an account is step one — being actively logged in is what enables the upload and generation features used in steps 3 and 7. If you registered in a different browser session, confirm you’re signed in before continuing.
Step 3 — Upload your reference image
The video’s approach here matches the current docs exactly. The “+” attachment icon is confirmed in the prompt input bar and is the correct upload point. Keep in mind it is visible in the logged-out state but only becomes functional once you’re signed in.

Step 4 — Send the reverse-engineering prompt
No official documentation was found for this step — proceed using the video’s approach and verify independently.
Step 5 — Review the structured prompt output
No official documentation was found for this step — proceed using the video’s approach and verify independently.
Step 6 — Open a new chat and paste the generated prompt
The video’s approach here matches the current docs exactly. “New chat” is confirmed in the left sidebar. One addition: the sidebar also surfaces a dedicated Images section as a standalone entry point for image generation. If you run this workflow regularly, navigating directly to Images skips a step compared to opening a new chat each time.

Step 7 — Generate the recreated image
No official documentation was found for this step — proceed using the video’s approach and verify independently.
Step 8 — Edit the prompt to personalize the output
No official documentation was found for this step — proceed using the video’s approach and verify independently.
Useful Links
- Generating Images in ChatGPT — OpenAI’s official article on GPT-4o image generation in ChatGPT, covering supported features, prompt behavior, and content policy boundaries.
- ChatGPT — The direct URL where all steps in this workflow take place; free account creation and login are both accessible from the homepage.


0 Comments