Manage Multiple Claude Code Sessions from One Dashboard
Running six Claude Code terminals across separate windows means constantly context-switching just to check status. The Agents View feature, introduced in Claude Code v2.1.139, consolidates every concurrent session into a single dashboard where you can monitor, reply, delete, and even spawn new agents without touching another window. By the end of this walkthrough, you’ll have full command of the Agents View and a repeatable workflow for managing parallel AI workstreams.
- Open any terminal and run
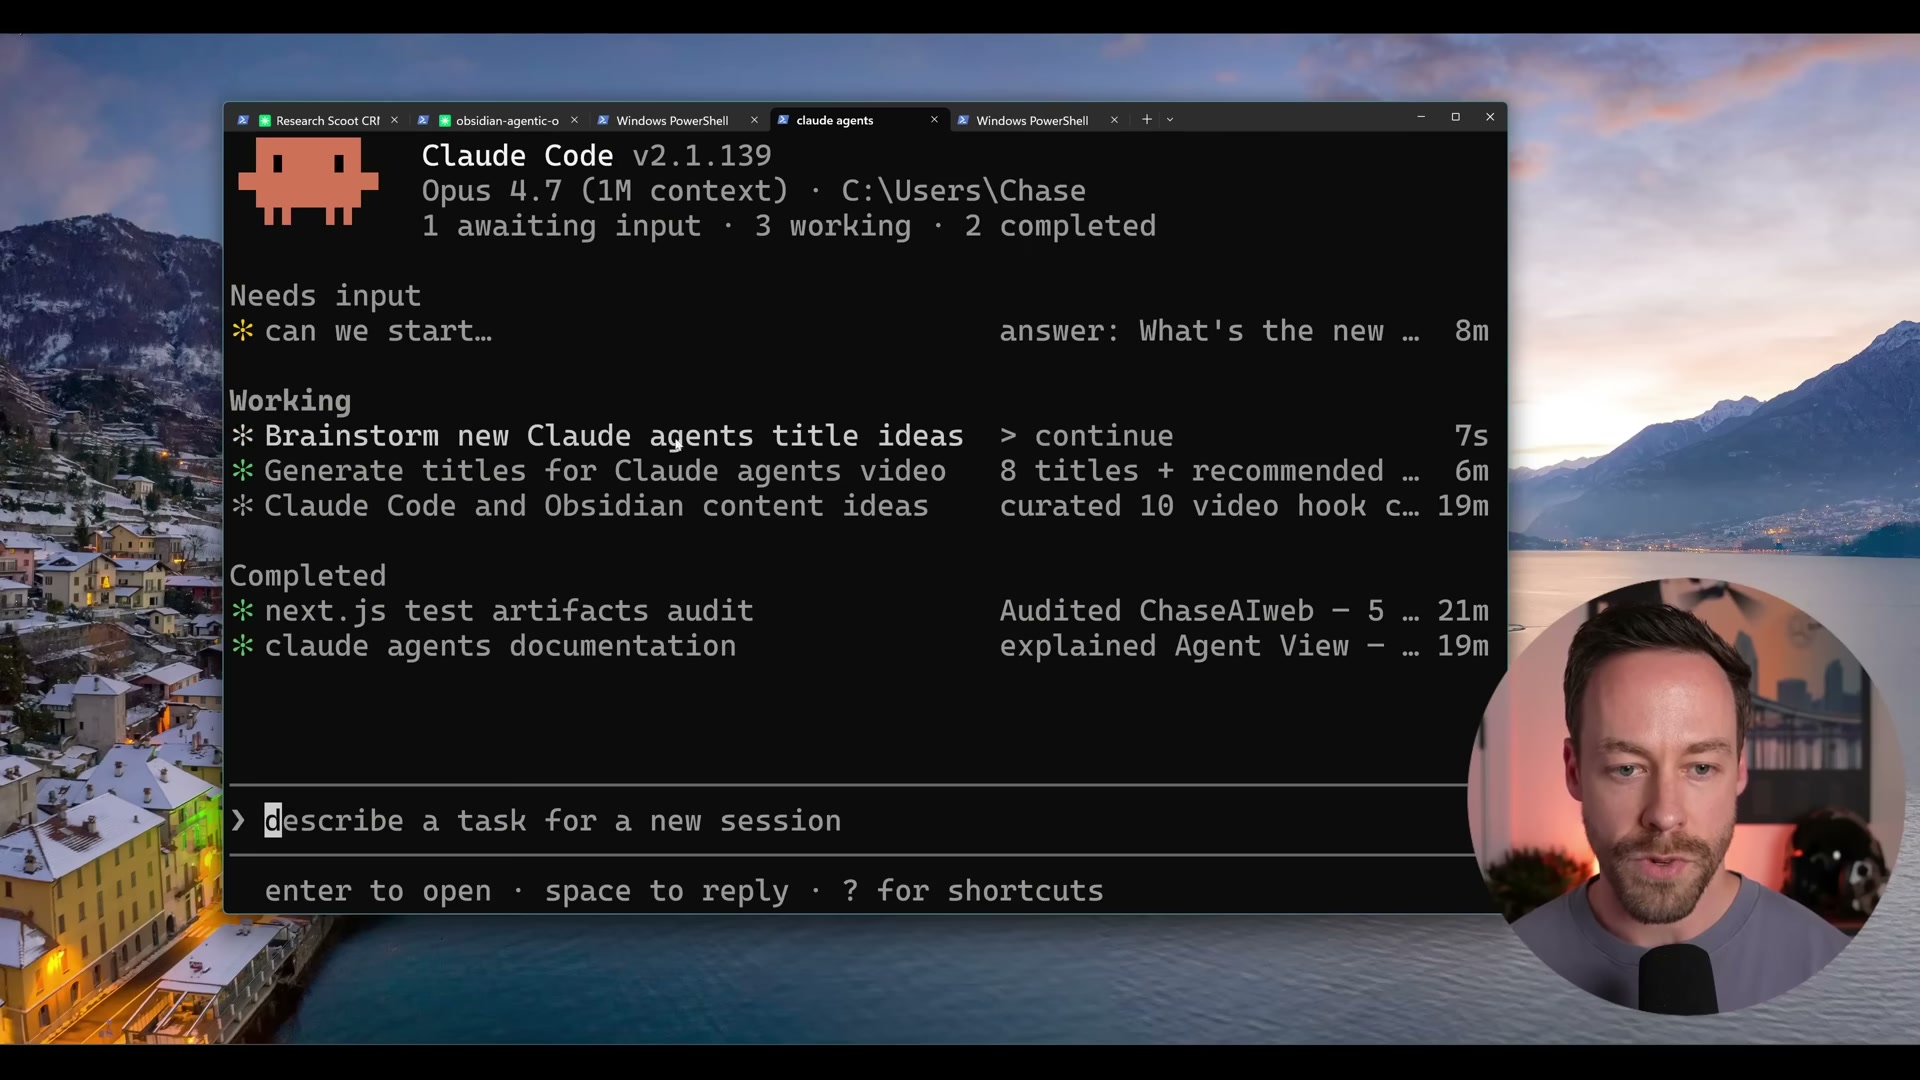
claude agents. Claude Code launches the Agents View dashboard — a persistent interface that discovers and tracks every Claude Code session running on your machine.

- Scan the three-section layout the dashboard presents: Needs Input, Working, and Completed. Sessions self-sort into the correct bucket in real time as their state changes, so you can triage at a glance without drilling into each one.

- Click any session tile to open that session’s full terminal view, exactly as it would appear if you’d launched it standalone. All output history is intact.
-
Press the left arrow key to navigate back to the Agents View from an open session. No keyboard shortcut memorization required — the footer always shows the available actions for your current context.
-
Mouse over any session and press Spacebar to peek at its status without committing to a full terminal switch. A summary pane appears showing elapsed time and recent activity, along with a reply field for sending a response directly from the dashboard.
-
To remove a session, mouse over it and press Ctrl+X. The dashboard prompts for confirmation before deleting, so there’s no accidental loss of a running session.
-
In a separate terminal, start a Claude Code session normally and assign it a task. Once it’s running, enter
/bgto push it into the background. It surfaces immediately in the Agents View under Working — no manual registration or configuration needed.
-
Close the Agents View window entirely. All tracked sessions keep running. Reopening the dashboard with
claude agentsreconnects to every session that was active — nothing is interrupted. -
Start a brand-new agent session without leaving the dashboard by typing a plain-English task description into the input field at the bottom of the Agents View and pressing Enter.
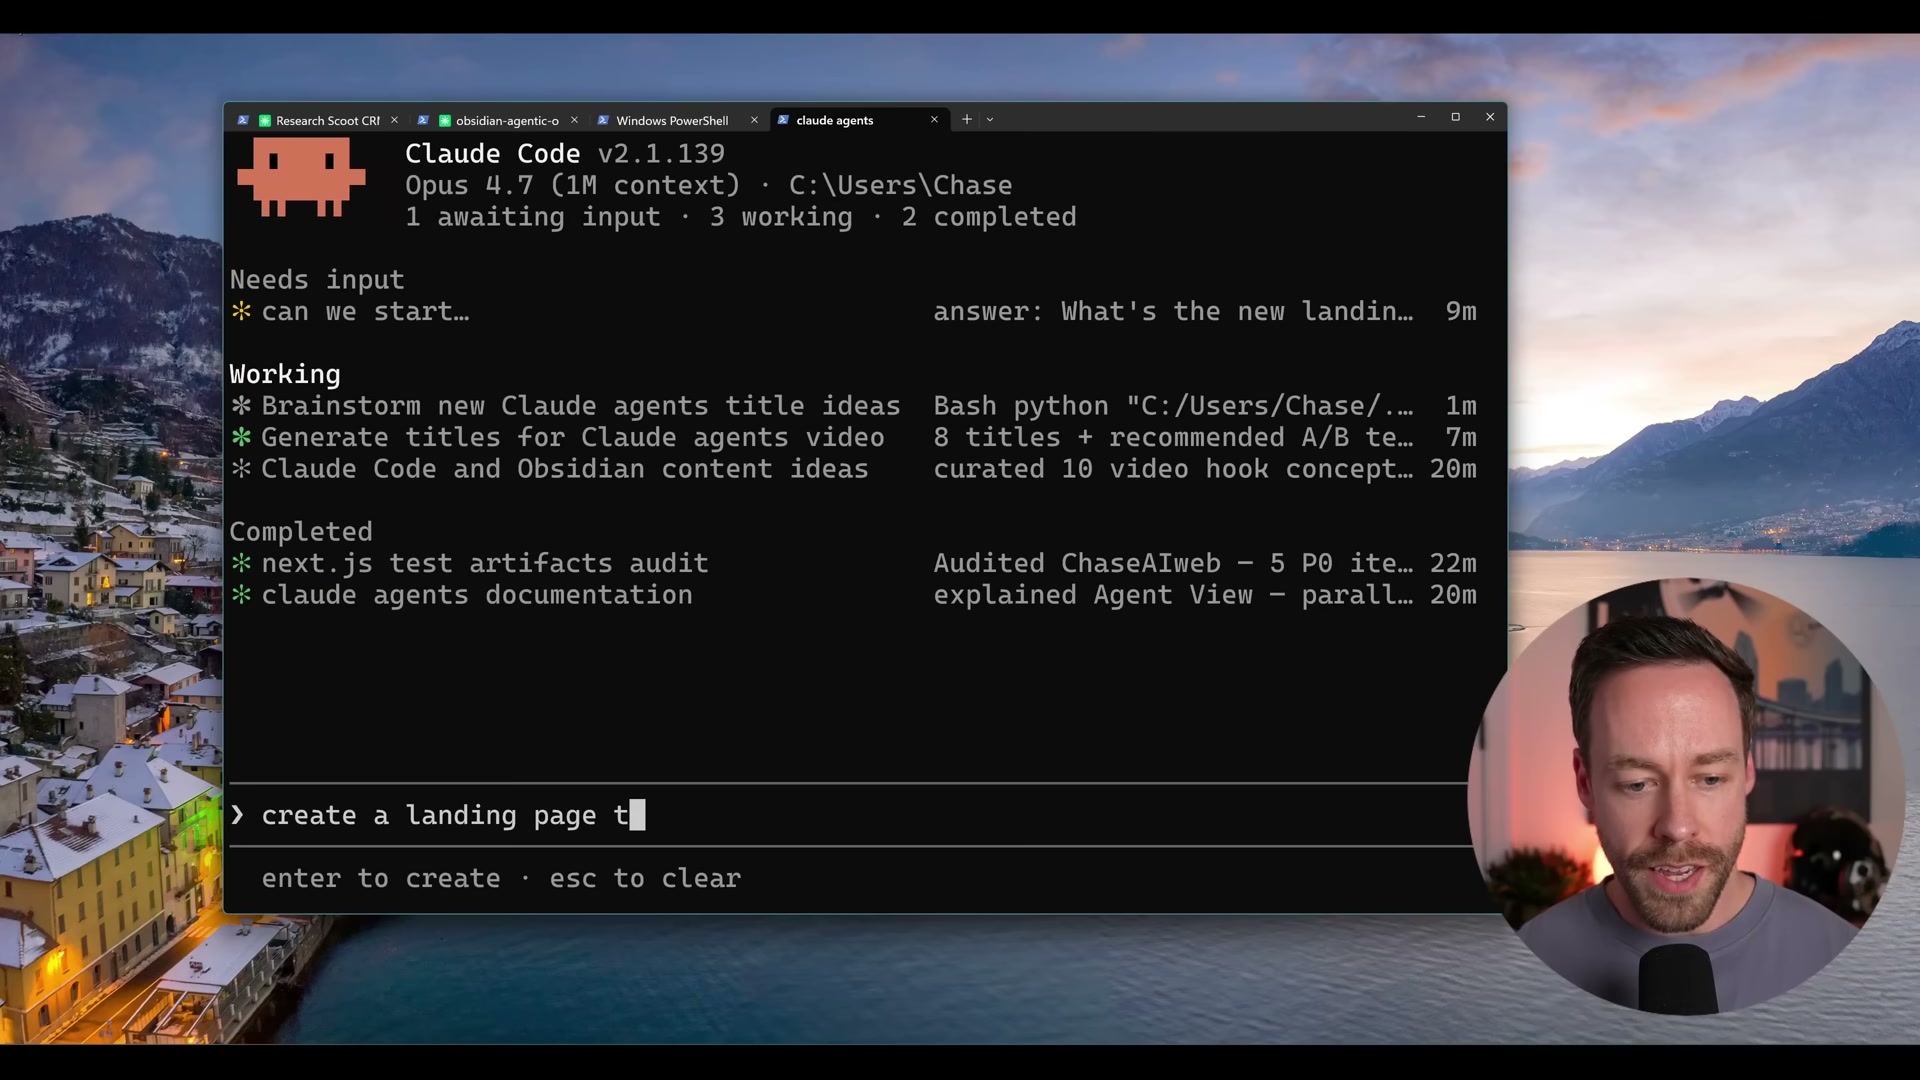
The new task appears in the Working list within seconds, and the live session counter at the top updates to reflect the addition.

How does this compare to the official docs?
The video demonstrates a fast, intuitive path to the Agents View, but Anthropic’s documentation covers additional keyboard shortcuts, session persistence behavior, and configuration options that expand what you saw above.
Here’s What the Official Docs Show
The video gives you a solid working picture of Claude Code’s Agents View, and everything covered in Act 1 is worth following as a starting point. This section adds one important layer the tutorial doesn’t address — subscription access requirements — while being transparent that the Agents View feature itself could not be cross-referenced against official documentation at the time of writing.
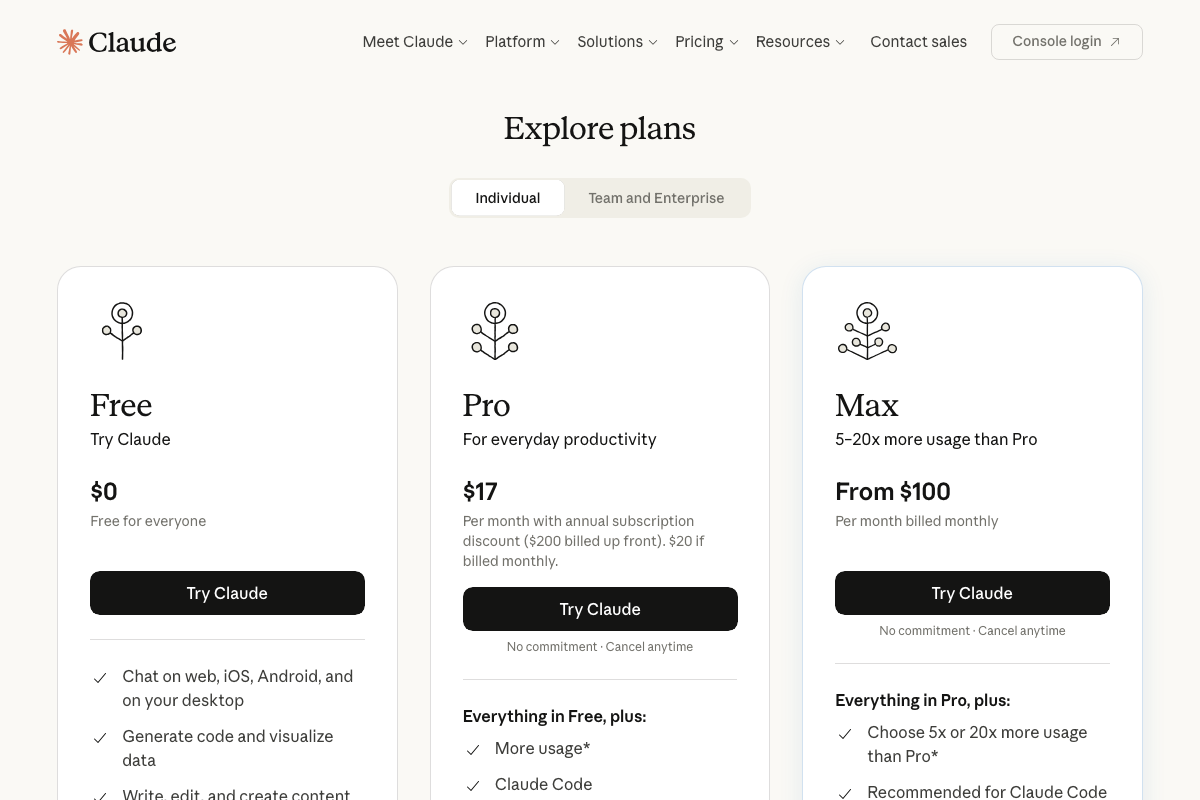
Before you run a single command: check your plan. The claude.ai pricing page confirms that Claude Code is not available on the Free tier. You need at minimum a Pro plan ($17/month billed annually, $20/month billed monthly) to access Claude Code at all. If you’re running parallel sessions at scale, Anthropic explicitly marks the Max plan (from $100/month) as “Recommended for Claude Code,” citing 5–20× more usage allowance than Pro.
Step 1 — Launch the Agents View with claude agents
No official documentation was found for this step —
proceed using the video’s approach and verify independently.

Step 2 — Read the three-section dashboard layout
No official documentation was found for this step —
proceed using the video’s approach and verify independently.
Step 3 — Open a session tile to view full terminal output
No official documentation was found for this step —
proceed using the video’s approach and verify independently.
Step 4 — Press left arrow to return to the dashboard
No official documentation was found for this step —
proceed using the video’s approach and verify independently.
Step 5 — Spacebar to peek at a session’s status
No official documentation was found for this step —
proceed using the video’s approach and verify independently.
Step 6 — Ctrl+X to delete a session
No official documentation was found for this step —
proceed using the video’s approach and verify independently.
Step 7 — Use /bg to background a session from the terminal
No official documentation was found for this step —
proceed using the video’s approach and verify independently.

Step 8 — Close and reopen the dashboard without losing sessions
No official documentation was found for this step —
proceed using the video’s approach and verify independently.
Step 9 — Spawn a new agent from within the dashboard
No official documentation was found for this step —
proceed using the video’s approach and verify independently.
Useful Links
- Claude Code overview – Claude Code Docs — The official technical documentation home for Claude Code; check here first for Agents View coverage as the feature matures.
- Sign in – Claude — The authentication entry point for Claude Code access across terminal, IDE, and browser environments.


0 Comments